Please read!
- To keep the page speed high, please read our advice in introduction point (5) below.
- Styles are visible in EN pagebuilder when you are editing, this is a helpful visual reference but do not rely on it being accurate of the front-end, especially with dynamic content.
- Include Alt Text for all images, please see our accessibility guide.
- Do not use images that have overlaid text, please see the accessibility guide for more information.
Introduction
This guide explains how to use our new Engaging Networks action templates. It is designed to be used alongside the EN training videos that cover the use of page builder in much more detail.
The video looks at the general set-up of an action page the principles apply to Email To Target (ETT) type actions and Petition pages. If you can't see the video please request access from Rhowena MacCuish Dann in the Digital team.
Before you scroll past, please read these very important notes:
Important notes
This guide will reference classes on content blocks. This is done here via the paint pallet icon:

A single class will not contain a space, a hyphen is used between words. When adding multiple classes these are separated with a space, e.g. 'donation-values-grid donate-panel'
When adding a shared component from the library and making any changes, you need to 'unlink' the page from the library before making any edits. This will ensure that you don't impact the other pages where the shared block is in use.

Mandatory settings
Forms fields should never be ticked as 'mandatory' in EN. We have our own script that determines which fields are mandatory - First name, Last name and Email address are always mandatory using Javascript.
To make additional fields mandatory, see the section 'Additional mandatory fields'.
Validation
Our action forms use enhanced validation through JavaScript. Our script disables any validation set by Engaging Networks provides in order to do this. However, in order to prevent hackers who disable our JavaScript from injecting code (such as unsafe URLs) into our form fields, the following fields require EN validators. These validators are attached to the fields by default in your account, so you should not need to add them yourself. This validation will not impact supporters, only hackers who disable our JavaScript.
| Field | EN Validator Name |
| First name | Restricted Alphanumeric (25 characters) |
| Last name | Restricted Alphanumeric (25 characters) |
| Address 1 | Restricted Alphanumeric (25 characters) |
| Address 2 | Restricted Alphanumeric (25 characters) |
| City | Restricted Alphanumeric (25 characters) |
| Postcode | Restricted Alphanumeric (25 characters) |
| Email Validator | |
| Phone number | Numeric Validator |
Field type
Fields must be of the following type:
| Field | Type |
| First name | Text |
| Last name | Text |
| Address 1 | Text |
| Address 2 | Text |
| City | Text |
| Region (if applicable) | Select |
| Country (this must have a top row with label 'Country' or the translation of, with the value field empty. This will show if there is any delay in IP detection. There should be no default country selected) | Select |
| Postcode | Text |
| Phone number | Text |
When adding images to your pages, please follow these steps to ensure that your images don't cause your page to load slowly.
- Ensure the images are sized correctly (see required dimensions for each module in the relevant sections below), don't just grab the image URL from asset bank or Umbraco.
- Ensure that all images are JPG format, PNG can be used on occasion for logos.
- You should not compress images before uploading them to Engaging Networks.
Upload images to the library folder in Engaging Networks by going to Pages >Components. This takes you straight to the image library.
Select a folder to save the new image into from the dropdown menu and click "UPLOAD" to upload new images. If an appropriate folder doesn't already exist for the purpose create one.
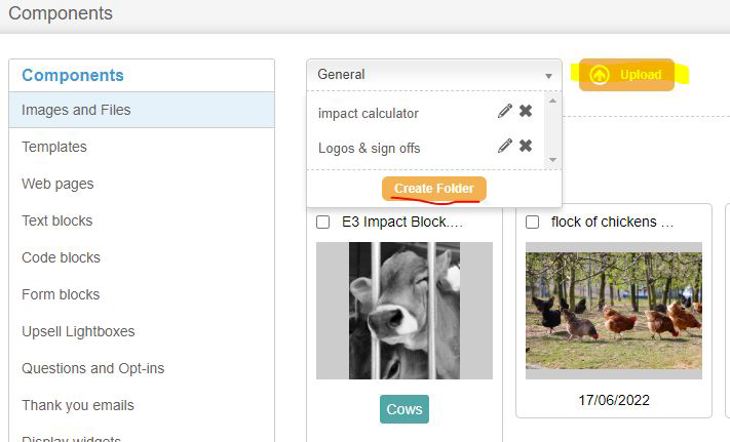
Select any uploaded image to locate and copy the url and add alternative text.
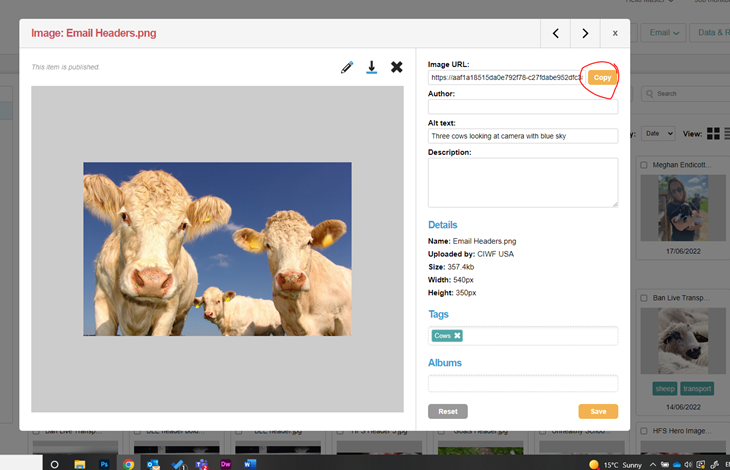
It’s important to give all images an Alt tag name both in Engaging Networks library and in the source code of the content block. Alt descriptions should describe how the image looks. In the case that someone could not see the image they would know what it was by reading the alt description. Giving images Alt descriptions also improves SEO (search engine optimisation).
Paste the copied url of the image directly into the HTML source code of the block using an image in the content block. Locate the src=url part of the code and replace the template https address. Don't forget to also update the alt text here too.
Here are some way in which you can keep these new pages loading quickly and providing a good user experience. Why is page speed so important for your conversion rates? More info can be found in our site speed guidelines.
- Whilst there are two options available to include YouTube videos on your pages, we do not recommended that you include video because this brings the page speed down significantly
- GIFs should be used sparingly and should always be compressed when they are used - max size 200kb. They should never be used as a header image - they are not accessible as you cannot pause them, they are distracting and can impact page conversion
- Avoid embedding iframes - these come with security risks and are slow to load, resulting in a poor user experience.
- Images should be JPG format, optimal for web and smaller than PNG
- Do not leave sections of commented-out code on the page
- When linking to external sites, the <a> tag should include the attribute rel="noopener" and links should always start with https. This improves our site security because it prevents the opening page to gain any kind of access to the our pages page. In turn this impacts our Google score. These are already included in your library block code for share links.
- Do not add any custom styles. Not only do inline styles impact page speed, our pages are designed inline with our brand guidelines and should not be customised (this includes colours, text alignment, background colours etc). Please discuss with us if you would like to make a change.
Action landing page creation
To create a petition or ETT page, duplicate the relevant template page in your library, do not create a page from scratch.
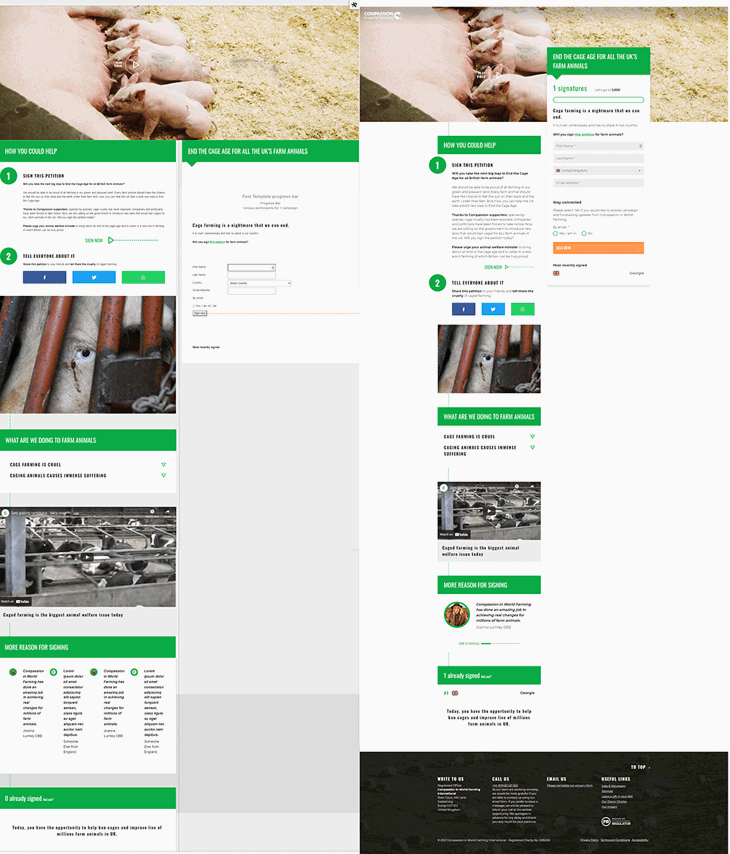
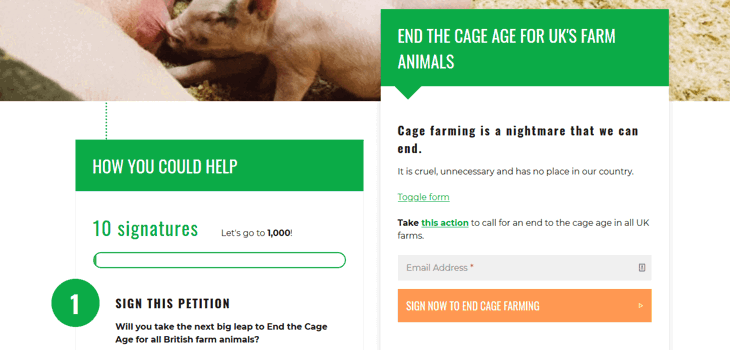
The action template has a two column structure. Below the header image, the form sits in the right-hand column, all other content is in the left-hand column. There is other content at the bottom of the page that is only seen in the back-end, this should not be edited.
Always edit content in the source code and when copying text from another source, use ctrl+alt+V to paste without formatting.
Do not add or remove any classes in the content block and do not restructure the code.
Page Settings
When you create your duplicated page, make sure that you complete the page settings using the cog icon. They should look similar to this.
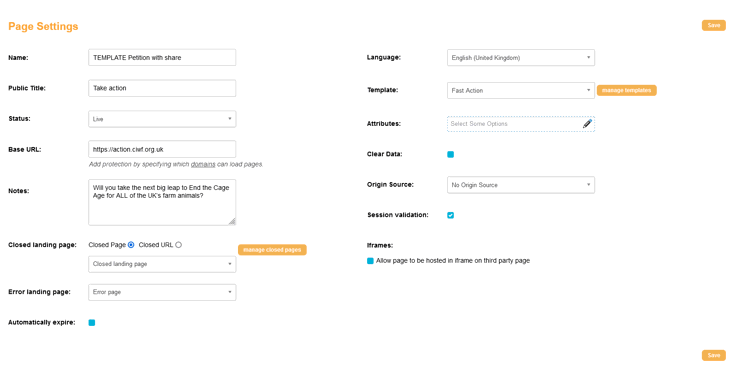
Name: this is for internal use only, use the Engaging Networks Pages spreadsheet.
Public Title: the text that appears in the browser tab. This should be short and engaging. This should be written in sentence case and never all uppercase
Notes: this should always be filled in with a short summary of the page call to action and is what search engines will display in result listing. For more info see our SEO Guide.
Session validation: this should always be ticked, the only time it would not be ticked would be for a Digi-managed page that has data POSTed to it.
Attributes: When we have a global campaign we typically choose an attribute such as "ECI" which must be named the same in all accounts. We add this attribute to any ECI campaign pages and this means we can easily report on and combine the signature totals of all market pages. When creating a page for a global campaign, check with the project lead what the attribute should be.
Action Page 1 components
Background image
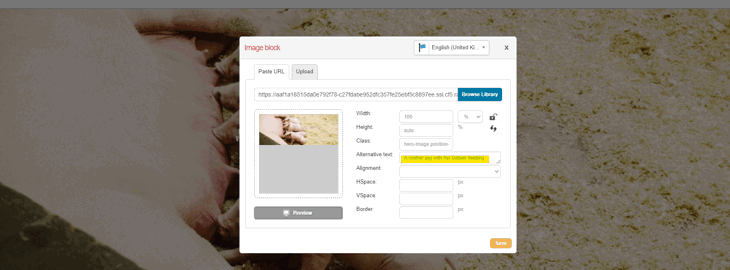
This image block sits in a single column row at the very top of the page, it must have the classes 'hero-image position-static parent-4-container-fluid' and the dimensions must be set to:
Width = 100 % , Height = auto
The background image must have a minimum width of 1400px and a maximum width of 2560px. Min-width is important for quality, max-width is important for page load speed. Always minify your images before uploading them.
On large screens, i.e. desktop computers, the full width of the image will display. The maximum display height is 700px, so if your image is taller than this it will be cropped on the top and bottom.
By default the image has a centred vertical alignment. It is best to use images where the main subject of the image is not towards the edge of the frame. However, you can choose to top or bottom align the background image using these classes:
background-bottom background-top
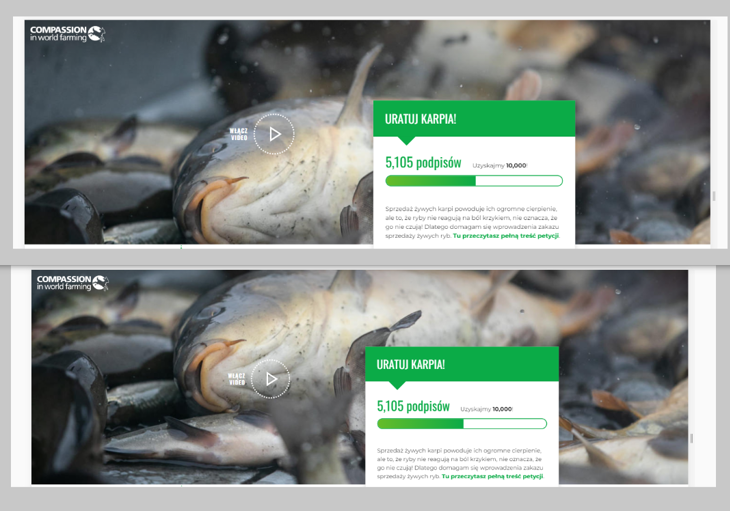
Class "background-bottom" will push the image up and you will see more of the bottom of the image.
Class "background-top" will push the image down and you will see more of the top of the image.
This class should be added to the image block class field with the other classes in this field, you will end up with something like this (background-top hero-image position-static parent-4-container-fluid)
Video pop-up

Please note: Videos can only be used on page 1 of an action.
To include a video and play button you need the library text block called 'Action Video Pop-up'. This must be at the top of the page, drag it in above the image. Remember to unlink it from the library if you are changing the video URL! When the 'play' button is clicked, the YouTube video pop-up will display. The 'sign now' button will close the pop-up and return the user to the page.

- To edit the 'play' button text, see HTML underlined in orange.
- To edit the 'sign now' button text, see HTML underlined in blue.
- To edit the 'video title' text, see HTML underlined in red.
- To edit the YouTube URL, you need to get the embed URL of the video you want to use, see instructions here. This video will autoplay when the pop-up opens. The URL must include ?enablejsapi=1 on the end before the quote marks " : data-video-src="https://www.youtube.com/embed/5KaltD0Z6ww?enablejsapi=1"

Left-hand column
The column consists of text blocks, the sign/send and share panel should be first, please ask if you need a different panel first. The accordion, video, testimonial and social proof panels can be displayed in the order that you choose, to re-arrange the order simply drag the text blocks up or down.
Petition Panel ‘Sign & Share'
Library text block 'Petition Sign & Share' or 'Petition Sign & Share - No Numbers'
This text block contains two sections:
Step 1 - Sign
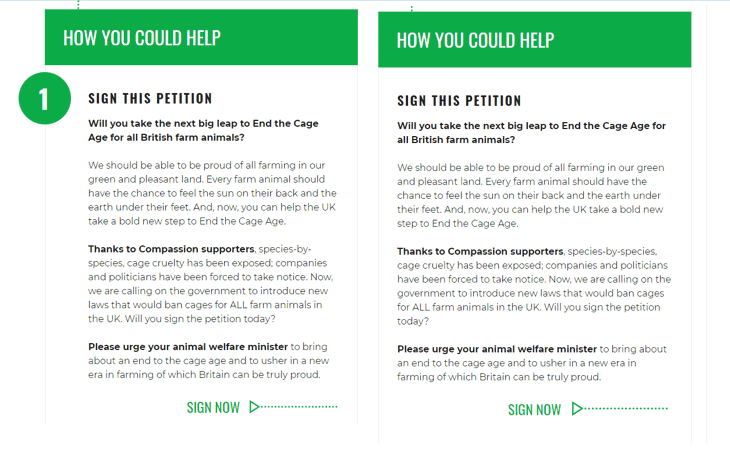
See highlighted below where to edit the green panel header and the title for ‘Step 1 - Sign’.
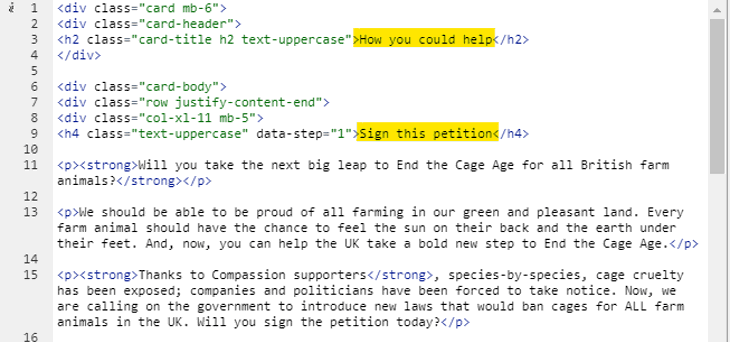
The piece of code below is for the 'Sign now' arrow. This can be deleted, it can also be moved however you might need help with the spacing in another location, just ask the Digi team if so.
<span class="btn-pointer d-none d-lg-block">Sign now</span>
Step 2 - Share
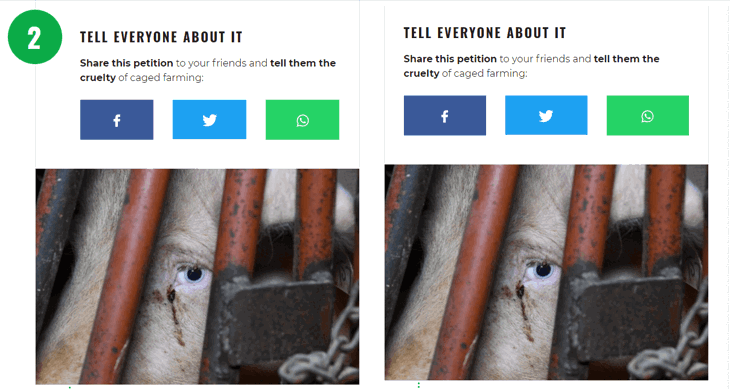
See highlighted below where to edit the title for ‘Step 2’, social share links can be edited from line 27 and below. This code is in the same text block as 'Step 1'
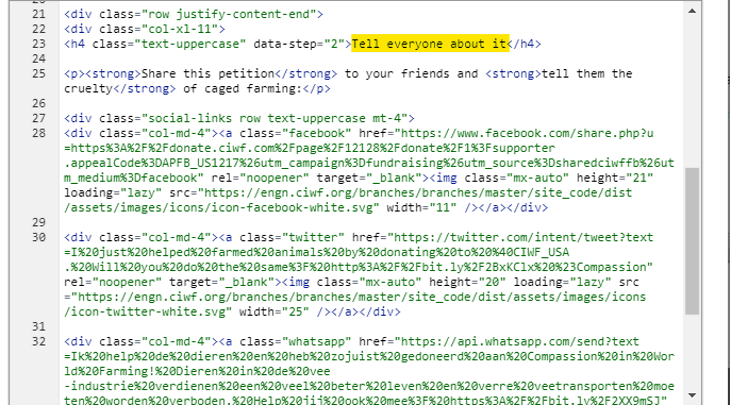
The image URL can be replaced at the end of the code, the image should always be the last element in this panel.
ETT Panel 'Send & Share'
For detailed instructions on creating ETT actions, please see our ETT Guide. This guide will not cover the detailed set up.

Then there are a few options for the 'Send & Share' block, depending on the type of ETT you are creating. You can use the following library text blocks:
- ETT Send & Share no message
- ETT Send & Share no message no numbers
- ETT Send & Share no message - photo
- ETT Send & Share non-editable letter
- ETT Send & Share non-editable letter - photo
- ETT Send & Share target block
- ETT Send & Share target block - photo
If you are using block 1 or 2 then simply follow the same editing instructions as above for the petition 'sign' panel. When using 2 (with photo), you can replace the image URL in the src attribute:
<img class="img-fluid mt-lg-n3 ml-lg-2 mb-3 w-75 mx-auto w-lg-auto" src="https://www.ciwf.org.uk/media/7433957/ farm-animals-pig-header.jpg" width="150" /></div>
Instructions on editing blocks 3 - 6, along with complete ETT instructions, are included in our ETT Guide.
Social Share Button Links
On all social media button titles please make sure to only use one word maximum for example, "Facebook" this ensures that the button looks correct across all devices and email clients.
Facebook and LinkedIn Share:
Take the default URL of the action/donation page and create the tracked url. See the tracked links guide on how to set up tracked links.
Campaign = Choose the appropriate campaign e.g cageage
Source = Facebook/Linkedin
Medium = shared
Once created, encode the tracked URL in the Encoder. Then add it to the URLs on the social share buttons.
Locate the piece of code below within the share-ask block code and replace with the new encoded url over part highlighted:
- on the FB link it goes after u= and before the "
- on LinkedIn it goes after url= and before the "

Be careful not to remove any other parts from the code block including the " at the end of the highlighted section.
When sharing an Engaging Networks action or donation page, Facebook generates messaging from the "Social Details/General Tab" of the page. The image is also pulled in from here.
WhatsApp and Twitter :
For Whatsapp and Twitter, take the tracked URLs and shorten them in Bitly.
Campaign = Choose the appropriate campaign e.g cageage
Source = Whatsapp/Twitter
Medium = shared
Then go to the Encoder and add it to the end of your share copy message. For example:
This brought a smile to my face! A really joyful video of farm animals having a life worth living #loveanimals https://bitly.com/yourlink
Encode the message and bitlylink, copy and paste it over the URL after "text=" and before the "

Be careful not to remove any other parts from the code block including the " at the end of the highlighted section.
When sharing an Engaging Networks action or donation page, the Twitter card pulls it's image from the "Social Details/General Tab" of the page being shared.
Email Share
This one is a little different. Notice there is a “mailto:” command and it has a subject line too, which also needs to be encoded (but separately to the body copy).
For Email Share, take the tracked URL and shorten it in Bitly.
Campaign = Choose the appropriate campaign e.g cageage
Source = eafemail
Medium = shared
Paste the subject line only in the Encoder, copy and paste the part after subject= and before &body=
Then clear the encoder and paste in the body message with the bitly link you created, and encode the message. Copy and replace everything after body= and before the " in the button code.

Be careful not to remove any other parts from the code block including the " at the end of the highlighted section.
Panel ‘Accordion’
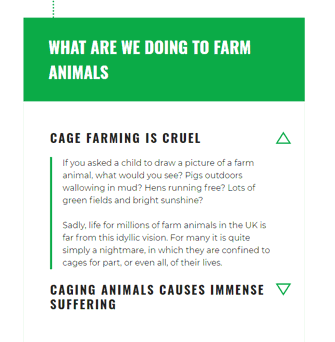
There are three library text block options for this:
- 'Action Accordion Panel x 2' - looks like the image above
- 'Action Accordion Panel x 4' - as above with three additional accordions
- 'Action Accordion Panel with text below' - includes the options to have text at the end of the panel, outside of the accordions
See highlighted below where to edit the green heading of the accordion panel, and where to find the <h4> tag for the item titles.
When using images in the Accordion panel, they should have a minimum width of 210px and minimum height of 115px.
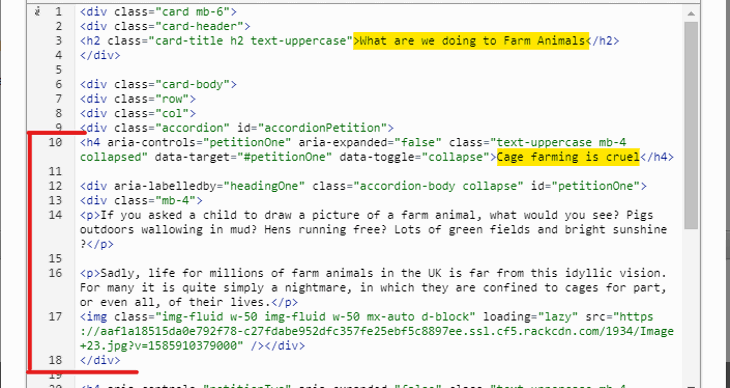
To add more accordions, you can ask the Digital team or follow the guide below. It's easy to put the code in the wrong place with this, so please just ask if you are unsure.
The first accordion begins on line 10 with the '<h4 aria-controls...' , and it finishes with a closing div </div> on line 18. Each accordion is structured the same, the red line shows where the first one begins and ends.
You have a library block with four accordions, to add a 5th, 6th, 7th accordion, copy and paste the code below after the first </div> at the end of the code, before the other </div>s below. The code in bold is the only code that changes.
Accordion code
<h4 aria-controls="petitionFive" aria-expanded="false" class="text-uppercase mb-4 collapsed" data-target="#petitionFive" data-toggle="collapse">Caging animals causes immense suffering 6</h4>
<div aria-labelledby="headingOne" class="accordion-body collapse" id="petitionFive">
<div class="mb-4">
<p>Lorem ipsum dolor sit amet, consectetur adipiscing elit. Etiam cursus dolor ac volutpat aliquam. Morbi eu nulla urna. Sed accumsan nunc sed turpis consectetur, nec consectetur dolor rhoncus.</p>
<p>Morbi accumsan ut orci sed vehicula. Pellentesque eget laoreet lacus, at varius tellus. Fusce non sem vel lectus commodo suscipit. Sed ultricies consectetur dolor, quis pharetra lacus.</p>
</div>
<h4 aria-controls="petitionSix" aria-expanded="false" class="text-uppercase mb-4 collapsed" data-target="#petitionSix" data-toggle="collapse">Caging animals causes immense suffering 7</h4>
<div aria-labelledby="headingOne" class="accordion-body collapse" id="petitionSix">
<div class="mb-4">
<p>Lorem ipsum dolor sit amet, consectetur adipiscing elit. Etiam cursus dolor ac volutpat aliquam. Morbi eu nulla urna. Sed accumsan nunc sed turpis consectetur, nec consectetur dolor rhoncus.</p>
<p>Morbi accumsan ut orci sed vehicula. Pellentesque eget laoreet lacus, at varius tellus. Fusce non sem vel lectus commodo suscipit. Sed ultricies consectetur dolor, quis pharetra lacus.</p>
</div>
<h4 aria-controls="petitionSeven" aria-expanded="false" class="text-uppercase my-4 collapsed" data-target="#petitionSeven" data-toggle="collapse">Caging animals causes immense suffering</h4>
<div aria-labelledby="headingOne" class="accordion-body collapse" id="petitionSeven">
<p>Lorem ipsum dolor sit amet, consectetur adipiscing elit. Etiam cursus dolor ac volutpat aliquam. Morbi eu nulla urna. Sed accumsan nunc sed turpis consectetur, nec consectetur dolor rhoncus.</p>
<p>Morbi accumsan ut orci sed vehicula. Pellentesque eget laoreet lacus, at varius tellus. Fusce non sem vel lectus commodo suscipit. Sed ultricies consectetur dolor, quis pharetra lacus.</p>
</div>
Panel 'Video'
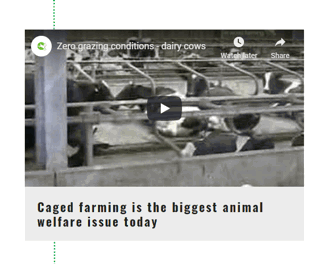
This is a library text panel 'Action Video Panel'. To replace the YouTube video in this module, locate the video on YouTube, click share below the video and then click the ‘embed’ option.
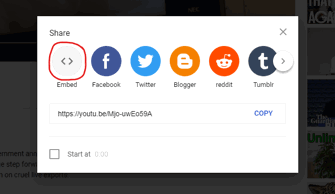
Copy this portion of the code:
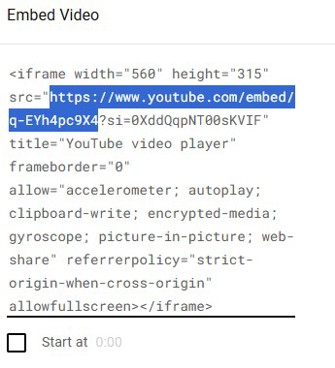
Replace the yellow section below and do not remove ?enablejsapi=1&rel=0. "enablejsapi" must be the first parameter after the URL.

The caption is edited in the H4 tag
Panel 'Testimonials'
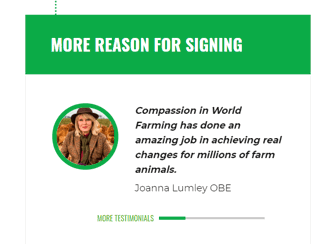
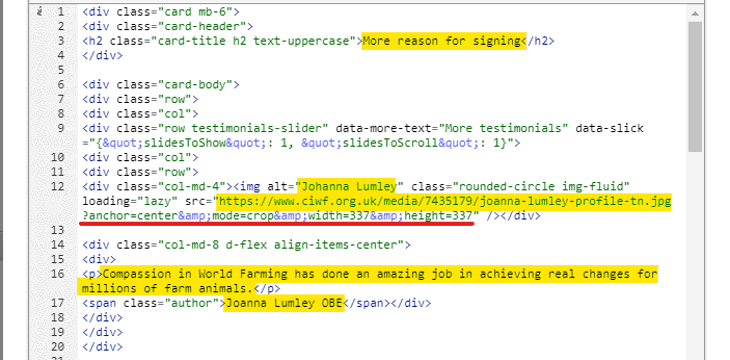
This is a library text panel 'Action Testimonial Panel'. See highlighted below where to edit:
- The green header
- The image alt description
- The image URL - Use the Umbraco image URL for an image with minimum width and height 337px. You need to use the URL from the info tab, not the url that contains 'assets'
e.g. https://www.ciwf.org.uk/media/7434644/istock_70872399_xxlarge.jpg After the URL you must leave the parameters underlined in red
?anchor=center&mode=crop&width=337&height=337
Remember the alt tag! - The quote and the author's name
Panel ‘Social proof - RollCall’
IMPORTANT: This block cannot be used with visible numbers if you have an ETT action where a single supporter might email more than one target. The data will not correctly display as EN has not designed their API call to work for this scenario. See section To hide the count on the RollCall.
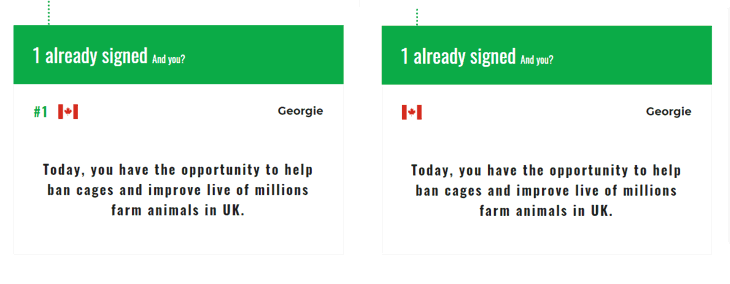
To be used in the left-hand column only. There are three options for this panel in your library containing different code depending on the number that you want to show in the header.
Do not make any edits to the code other than the text, the Javascript determines the campaign ID and pulls in the data automatically.
Library block names:
- Action RollCall Social Proof Panel_total participations = the total number of times the action was submitted
- Action RollCall Social Proof Panel_total unique participants = the total number of supporters who submitted the action (i.e if one supporter signed the petition twice, it will only count as one signature)
- Action RollCall Social Proof Panel_progress bar total = this will show whatever number is in the widget, including if you set a start number above zero.
Important notes!
- When using the block 'total participations' use the value 'participations' in your progress bar otherwise the numbers will not match.
- When using the block 'unique participants' use the value 'unique participants' in your progress bar otherwise the numbers will not match.
- When using the block 'progress bar total', this block will only work if you have a progress bar on the page (visible or hidden) using the correct code for the text (see the progress bar section below). If you include a starting number on the progress bar, the RollCall count will not match this.
- The EN API that provides the RollCall of supporter names is slower than the progress bar is to update, if you are using the total participations or total unique participants RollCall then you might notice this short delay. However, we have included logic which means that the number in the green RollCall header will always match the count of signers underneath.
- Please be careful with the language you use use for each metric:
- When using 'total participations': the text 'XX signatures so far!' is correct.
'XX people have signed', is incorrect, because someone may have signed it more than once. - When using 'unique participants': the text 'XX people have emailed their minister!' is correct.
"XX emails have been sent" is incorrect because it is the number of individual supporters that have taken action, not the number of signatures.
- When using 'total participations': the text 'XX signatures so far!' is correct.
To edit the green heading, description and button text, see highlighted below.

To hide the count on the RollCall
Drag a code block to the bottom of your page and load from the library 'Action Variable - Hide RollCall Count'. Do not unlink this from the library, if you decide that you want to show the count again, just delete the block from the page.
Right-hand column
Form
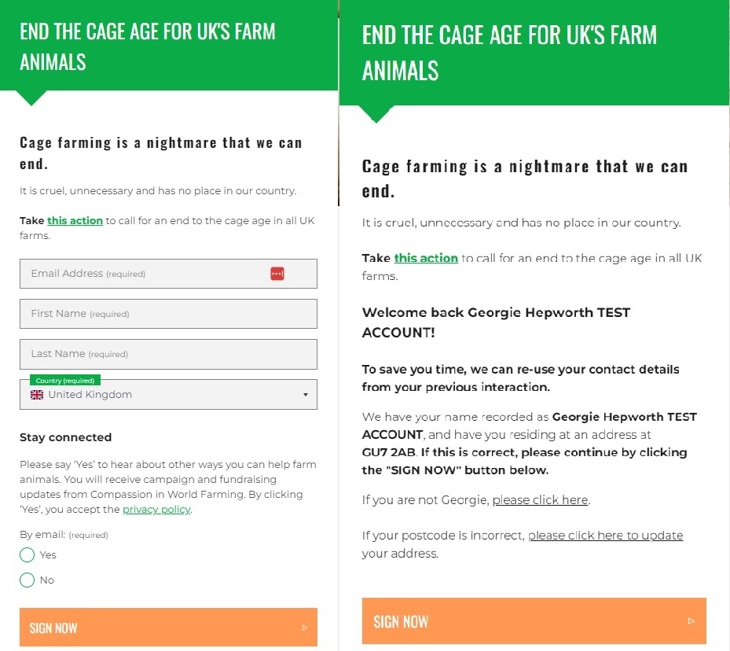
Form block title
Library text block: Action Form Title. This does not need any classes.

The title must be edited in the source code, highlighted below:

Form block introduction text
This is a library text block 'Action Form introduction' above the form block, the source code for this block has no special classes, however the text block itself needs the custom classes ‘into-card py-4 text-panel'.
Form block fields
These forms are library form blocks 'Petition Form' and 'ETT Form' including variations to include phone. These have the custom class ‘into-card’. This form must always have the country field for the SF sync, phone number collection and for the social proof rollcall to work.
Form pre-population and leadgen
If a supporter is known to us in the EN database, and they arrive from an email, they will be welcomed back and their known data hidden for data protection. If a supporter is new, they will be shown the empty fields.
Wide or narrow form
By default, the left-hand and right-hand columns have equal widths on a desktop. As shown in the image above, you have the option to make the left-hand form block of your action pages narrower.
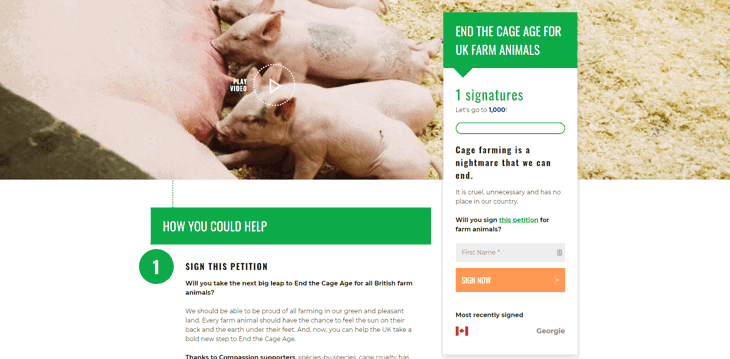
To do this, you need to do two things:
- Edit the title text block of your form in the right-hand column, click 'load from library' and swap in the text block called 'Action Form Title Narrow' for the green header title above the form. This has the class 'parent-1-col-lg-4' which is making it narrow.
- Edit your left hand column sign/send & share text block (unlink from the library if necessary). Click the pain pallet, in the custom class field the first class you will see is 'parent-1-col-lg-6' , change the 6 to an 8, and save.

Social Proof Rollcall Slider
NB: This block cannot be used if you are using an ETT action where the target database you are using means that a single supporter could email more than one target.
To be used underneath the form only. The RollCall below the form is a library text block 'Action RollCall Slider'. To edit this block, please only change the text in yellow and keep it saved to the library. The Javascript determines the campaign ID and pulls in the data this way automatically, no other edits should be made. It has the class 'into-card'. The RollCall here will slide through the most recent five signers.

NB: You cannot use both the rollcall and image sliders at the same time
Image Slider
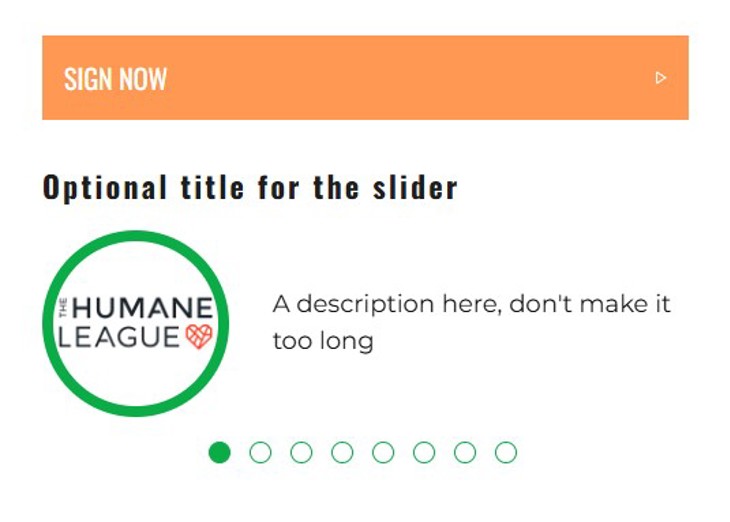
To be used underneath the form only. The Image Slider below the form is a library text block 'Image Slider Below Form'. The text block reequires the classes 'into-card py-3'. This block has 8 slides in it by default, please request more from Digi. The slide images are styled as a circle with a border.
There is an optional title in this block, if you do not want a title simply delete the title tag. Each slider comprises of paragraph text and an image.
To edit the image just replace the URL, the text highlighted in yellow is where you would change the description. The red line indicates the code of a single slide, if you need remove slides this is what you would remove, you can ask Digi to do this if you are unsure.
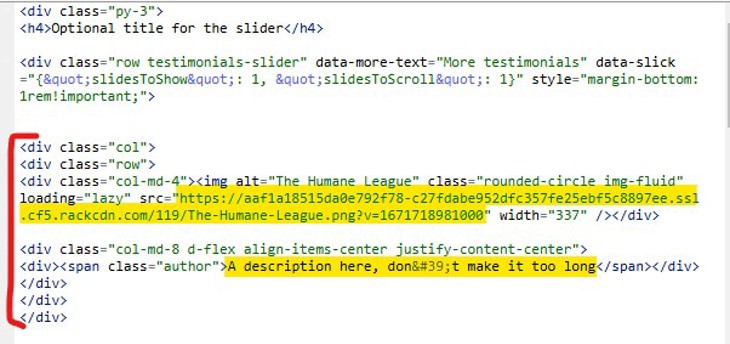
NB: You cannot use both the rollcall and image sliders at the same time
Phone Number Collection
The phone field only displays if the country selected in the forms matches the EN account that the page is from, e.g. if someone in the UK is on a Dutch page, they will not be asked for their phone number.
For email/warm audience: The phone field only shows if an existing supporter has not given us a number before
For leadgen/cold audience: The phone field always shows (if country matches the page as above)
US and NL: Phone opt-in and SMS opt-in are never visible to the supporter. If a valid mobile number is given, SMS and Phone are set to Y in the back-end. If a valid landline number is provided, only the Phone opt-in is set to Y.
FR: Phone opt-in is never visible to the supporter. If a valid mobile number is provided, Phone opt-in is set to Y in the back-end, SMS opt-in becomes visible. If a valid landline number is provided, Phone opt-in is set to Y in the back-end.
All other markets: If a valid mobile number is entered, Phone and SMS opt-ins become visible. If a valid landline number is entered, only the Phone opt-in becomes visible.
IMPORTANT: Do not just drag the phone number field into the existing form. If you are not confident with the below, make a digital case and we can do this for you.
To include the phone number field on the page:
- Click the pencil icon of the form on your page, then click 'load from library', replace it with 'Petition Form PHONE' or 'ETT Form PHONE' from the library and click save. If possible, do not unlink this form from the library.
The library form is required because it must be set up in a specific way:
- The phone number field must be type = text
- The phone number field must be non-mandatory in the form (even if you want to make it mandatory - more on this below)
- Both the phone and SMS opt-in questions must be included on the form, even if you are one of the markets where these opt-ins will be hidden from supporters
- If the block is unlinked from the library, we will not be able to easily make any important or necessary changes to all of your action pages collection phone at once.
The phone number field in the library form will be non-mandatory. If you would like to make it mandatory, do not make the field mandatory in the form block, instead:
- Add a new code block to the bottom of your page
- Click the pencil icon and then load from library, load in the code block 'Variable - Phone Mandatory' and click save. Do not unlink this from the library.
Progress bar widget
Always delete and create a new progress bar when you duplicate a page. The existing one will be connected to the original page and will be overridden there when you make changes on your new page.
Progress bars are automatically saved to the library and cannot be 'unlinked' like other content blocks. Make sure that you name the progress bar to match the action page so you always know if you are editing the correct one.
You can read more about this widget on the EN support pages.
1. Set up the progress bar
First, go to the sidebar menu and click 'display widget', drag that onto your page below the form title text block. Select 'progress bar' and now you will see the settings screen.
By default, the widget will pre-select the page that you are editing. If you want to add more pages to the total count, use the pencil icon to select additional page/s.
2. Settings tab
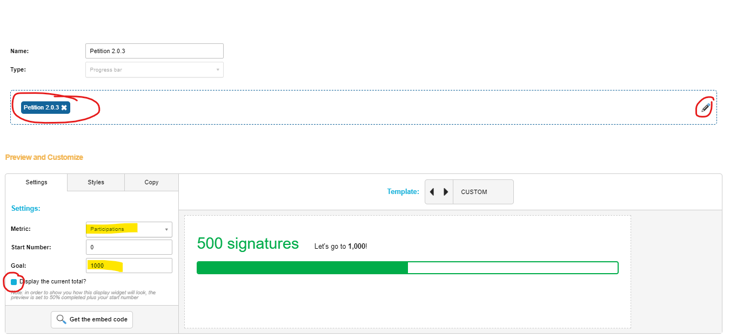
Pencil icon - to include the signature or participation totals from other pages, click the pencil icon shown above. You can:
- Select "Current account" and find the page/s in your account that you want to include, click on the page name so that it becomes blue to highlight it, click the orange select button and then save the widget
- Select "Other accounts" to combines totals for a global campaign by choosing pages from other market accounts. Search for the attribute that all of the pages share such as "ECI". If you are not sure about the attribute you can check with Digi team or campaigns team

Metric - The default metric setting for petitions is the number of participations in the campaign, this will count one person signing twice as two actions. It is recommended that you use 'unique participations' instead. Note that if multiple pages are added to a counter and a supporter signs two of the pages that signature will be counted twice on the Total Participations display.
Start number - You can opt to have a start number to give the impression that your campaign already has signatures, however, be aware that if you also have a RollCall on the page the numbers will not match up.
Target - To set the goal number, enter the number in the 'goal' field.
'Display the current total' should be unchecked, we display this a different way.
3. Styles tab
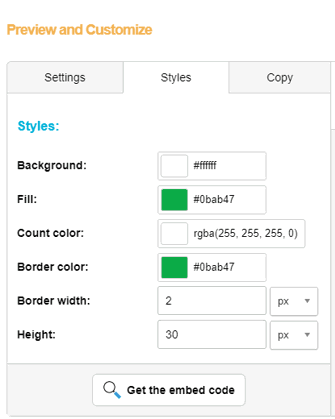
The progress bar needs the above styles, these styles follow the CIWF brand guidelines and should not be customised.
You will need to change Fill and Border color to #0bab47, Border width to '2' and Height to '30'.
4. Copy tab
To add the copy above the progress bar, use the code below in the source code editor and replace the text.
NB: there is a bug with the RTE editor, if you click 'source' to edit the code, you must then click source again to go back to the RTE view before saving. Otherwise, your changes will not be saved.
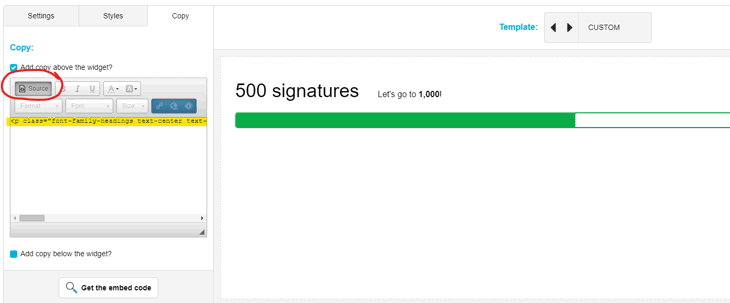
Here is the full code:
<p class="font-family-headings text-center text-lg-left"><span class="text-primary" style="font-size:2.25rem;"><span id="petition-total">{widget_data~count}</span> signatures</span> <span class="font-family-base d-inline-block">Let's go to <strong id="goal-total">{widget_data~target}</strong>!</span></p>
The number of signatures and the goal number will be populated automatically using the {widget_data~}.
NB: In the code above there is a <span> surrounding the {widget_data~count}, this is important and should not be removed, the id="petition-total" is where the RollCall 'progress bar total' panel version takes it's total number from.
To move the progress bar to the left-hand column
Follow steps 1 - 5 above, then edit your progress bar and click 'Get the embed code'. Copy the Script, not the Iframe.
Open up notepad or similar, and paste the code in there, it will similar to this.
<script data-locale="en-US" data-id="949056" src="https://e-activist.com/ea-demo/frontend/pbAssets/src/js/lib/enWidget/enWidget.loader.js" ></script>
Then surround this code with some divs:
<div class="row">
<div class="col mb-5">
<script data-locale="en-US" data-id="949056" src="https://e-activist.com/ea-demo/frontend/pbAssets/src/js/lib/enWidget/enWidget.loader.js" ></script>
</div>
</div>
Now your code is ready to add to your page. Edit your left-hand sign/send & share text block and paste the code. As long as you paste the code after <div class="card-body">, it should display well. Here are a couple of suggestions:
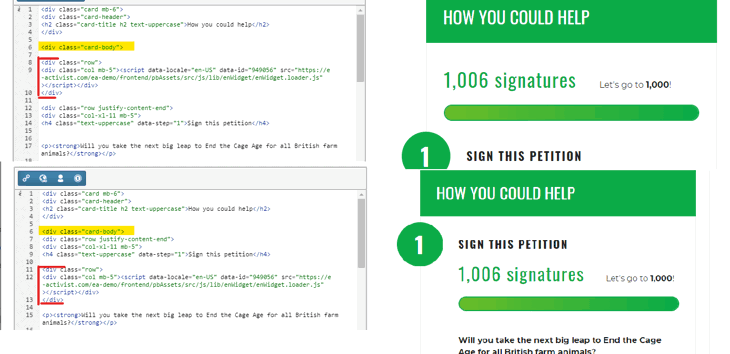
Then, finally:
To hide the progress bar in the right-hand column
Drag a code block to the bottom of your page. Load from the library ' Action Variable - Hide Progress Bar'. Do not unlink this from the library, if you want to show the progress bar again, simply delete this code block from your page.
Image Credit
Library Block: Image Credit
If you need to include credit for any images on your page, you can add a new row below the two-column row that contains the modules and form. Then drag the library text block "Image Credit" to the bottom of your page, unlink and edit it to include the credit with a simple <p> paragraph tag. The image copyright symbol displays automatically on the left of the text.

Pop-up messages
Add a link to any text on the page to display the email or petition text in a pop-up. You can have multiple pop-ups on a page.
To create the pop-up link:
Surround the text that you want to open the pop-up with this <a> tag: <p>Read the message <a class="open-modal" data-modal-class="modal-1" href="#"> here</a></p>
To create the connected pop-up:
Below your final extended panel, add a one-column row and inside that add a text block, load the library text block 'Action pop-up message 1'. This includes the class 'modal-1' which matches the class in link and connects it.
To create more pop-ups:
Follow the same steps as above, but in the link replace the final '1' in 'modal-1' for '2' and then '3' and so on <a data-modal-class="modal-2" href="#"> , <a data-modal-class="modal-3" href="#">
Add another pop-up text block, unlink it from the library and change the class in the paint pallet section to modal-2 and modal-3 etc to match the <a> class respectively. Follow this pattern to create more, or ask the Digital Team.
Pop-up Content
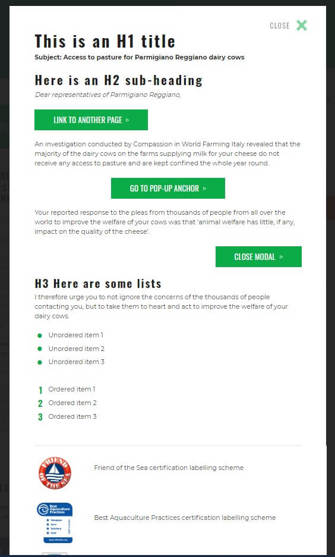
In a pop-up you can include lists, horizontal rules, H1, H2, H3, images, text links and button links. The 'Pop-up message 1' library block has examples of all of these that you can copy.
The styles shown in this example are applied by default, excluding the image display and buttons, which require specific code:
Images
To display an image and text as shown, use the following code and replace the image URL and text. The image width can be increased or decreased, remember to consider mobile display first!
<div class="clearfix mb-4 d-flex align-items-center"><img class="float-left pr-5 loading="lazy"" src="https://assets.ciwf.org/media/7440956/friends-of-the-sea-logo-436x436.jpg" width="150px" />
<p>Friend of the Sea certification labelling scheme</p></div>
If you need help with alternative image layouts please ask the Digital team.
Text links:
To create an anchor link, find the text that you want to link to and give it an 'id' surrounded with quotation marks inside the opening tag:
<p id="anchor1">Anchor message</p>
For a text link to your anchor, inside your <a> tag, the href should be a hashtag followed by your anchor text e.g. <p>Read <a href="#anchor1">this</a> anchor message</p>
The same rule applies in the below button anchor links.
Pop-up Button code options
- center aligned: <div class="clearfix my-4 d-flex justify-content-center"><a class="btn btn-primary text-uppercase" data-dismiss="modal" href="#">Close modal</a></div>
- left aligned: <div class="clearfix my-4"><a class="btn btn-primary text-uppercase float-left" data-dismiss="modal" href="#">Close modal</a></div>
- right-aligned: <div class="clearfix my-4"><a class="btn btn-primary text-uppercase float-right" data-dismiss="modal" href="#">Close modal</a></div>
- center aligned: <div class="clearfix my-4 d-flex justify-content-center"><a class="btn btn-primary text-uppercase" href="https://www.ciwf.org.uk" target="blank" rel="noopener">Link to another page</a></div>
- left aligned: <div class="clearfix my-4 d-flex"><a class="btn btn-primary text-uppercase float-left" href="https://www.ciwf.org.uk" target="blank" rel="noopener">Link to another page</a></div>
- right aligned: <div class="clearfix my-4 d-flex"><a class="btn btn-primary text-uppercase float-right" href="https://www.ciwf.org.uk" target="blank" rel="noopener">Link to another page</a></div>
- center aligned: <div class="clearfix my-4 d-flex justify-content-center"><a class="btn btn-primary text-uppercase" data-dismiss="modal" href="#anchor1">Close modal & go to anchor</a></div>
- left aligned: <div class="clearfix my-4"><a class="btn btn-primary text-uppercase float-left" data-dismiss="modal" href="#anchor1">Close modal & go to anchor</a></div>
- right aligned: <div class="clearfix my-4"><a class="btn btn-primary text-uppercase float-right" data-dismiss="modal" href="#anchor1">Close modal & go to anchor</a></div>
- center aligned: <div class="clearfix my-4 d-flex justify-content-center"><a class="btn btn-primary text-uppercase" href="#1A">Go to pop-up anchor</a></div>
- left aligned: <div class="clearfix my-4"><a class="btn btn-primary text-uppercase float-left" href="#1A">Go to pop-up anchor</a></div>
- right aligned: <div class="clearfix my-4"><a class="btn btn-primary text-uppercase float-right" href="#1A">Go to pop-up anchor</a></div>
Action thank you page
By default your templates have a thank you page (page 2), details on editing thank you page content are below. This is not considered to be a redirect and is instead considered part of the same action. When you view this page after submitting the form on the previous page, there will be no tracking seen or required in the URL.
Redirect to Donate Thank You page
Alternatively, you can remove the thank you page if you want to redirect supporters to a donation page instead, here is how you do so:
- Select the page 2 and click the red X to remove it
- Add a new page using the plus icon, this brings up a pop-up menu
- Select Link to Campaign
- Search or scroll to find the page in your account that you want to link to
- Save!

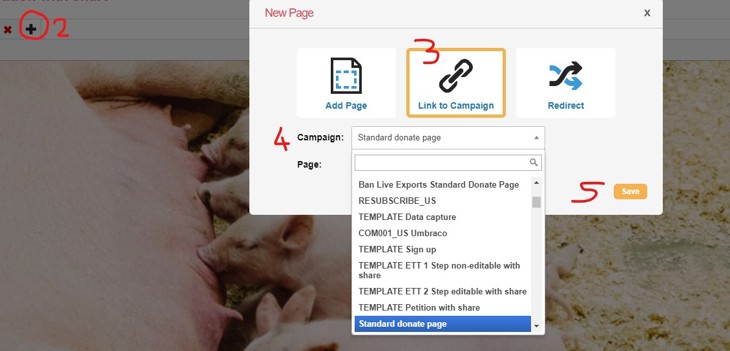
Using the Link to Campaign option automatically adds "?chain" to the end of the URL which is required to carry supporter data and tracking across to the donation page. You could also use the option Redirect and put the URL in the field, but you would need to manually add "?chain" to the end of the URL if doing so.
Action Redirect For Specific Country / Region
You can set an action page to redirect to another page or external (non-Engaging Networks) page based on various rules when the user submits the form or the database returns certain values.
Rules can be set up in the Components Menu > Processing Rules > Redirect and Filter.
Here is an example of how supporters who are not USA citizens or not living in a certain state can be diverted to different actions or pages.
- Set it up so you have IF Supporter Submits The Page - WITH Country / Region
- In the text field enter the two-letter abbreviation of the state or country using the two-letter ISO codes. "OR" values can be created by separating them with a tilde( ~ ) and no spaces.
- THEN Redirect to either External URL or Page
- Select the page or enter the external URL
- Add more filters as required, but remember the order is important and is affected by priority. eg if using a Region and a Country filter the Country rule must come first.
Editing the thank you page
For the action thank you page, not for a redirect to a donate page or other action.
Background image
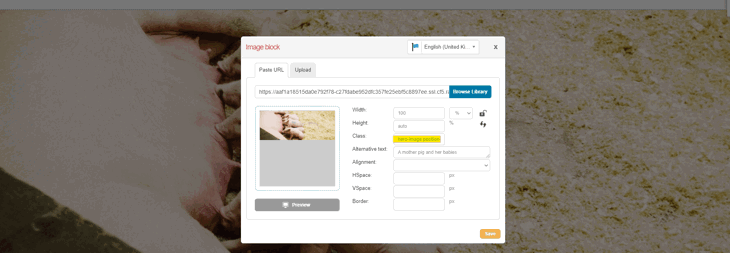
This image block sits in a single column row at the very top of the page, it must have the classes 'hero-image position-static parent-4-container-fluid' and the dimensions must be:
Width = 100 % , Height = auto
The background image must have a minimum width of 1400px.
On large screens, i.e. desktop computers, the full width of the image will display. The maximum display height is 700px, so if your image is taller than this it will be cropped on the top and bottom.
TY share module

Library text block: Action TY Page Share Block
Below the image is a two-column row, the left remains empty and the right-hand column contains a single text block. This block requires classes 'parent-1-col-lg-6 parent-1-pb-6 parent-1-order-first parent-1-order-lg-last parent-1-shifted-up parent-5-bg-white parent-3-container parent-3-px-3 parent-2-justify-content-center'
Edit the text within the source code only.
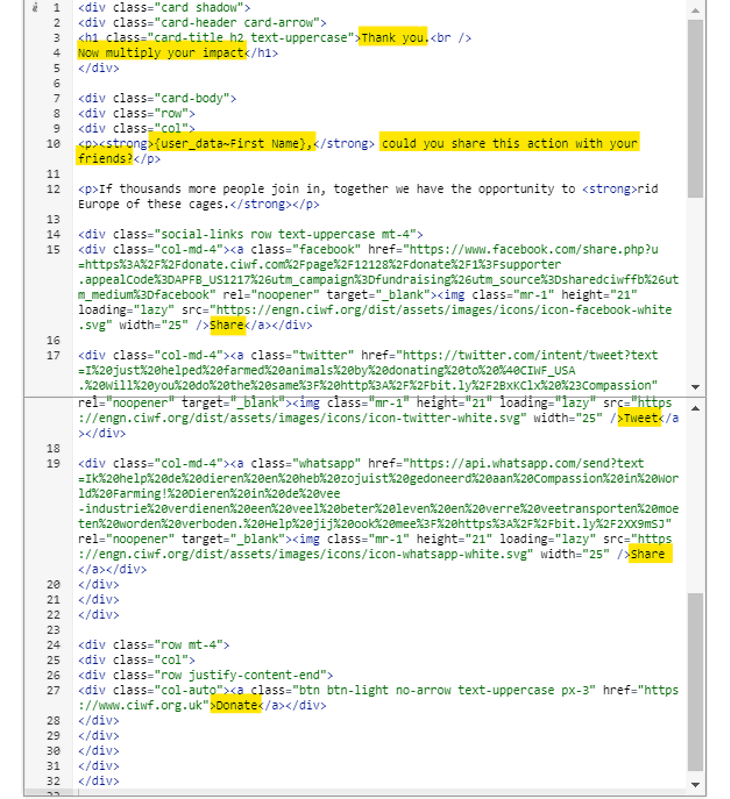
No thanks
The code for the button is at the bottom. To change the button text and redirect link, edit this (in bold) in the source code below. You must include ?chain on the end of the URL.
<div class="row mt-4">
<div class="col">
<div class="row justify-content-end">
<div class="col-auto"><a class="btn btn-light no-arrow text-uppercase px-3" href="https://donate.ciwf.org.uk/page/55182/donate/1?chain">Donate</a></div>
</div>
</div>
</div>
Share links
To edit the share links, simply replace the encoded URLs.
You have four social options for share buttons, Facebook, Twitter, Email and Whatsapp. There are a few different layout options. The code for all of this is below. If you need any adjustments made to the existing code, please ask Digi.
NB These layouts are for desktop - all options below will be stacked on mobile. Share buttons contain empty alt tags as the icons are decorative.
Share button code

<div class="social-links row text-uppercase mt-4">
<div class="col-md-4"><a class="facebook" href="https://www.facebook.com/share.php?u=https%3A%2F%2Fdonate.ciwf.com%2Fpage%2F12128%2Fdonate%2F1%3Fsupporter.appealCode%3DAPFB_US1217%26utm_campaign%3Dfundraising%26utm_source%3Dsharedciwffb%26utm_medium%3Dfacebook" rel="noopener" target="_blank"><img alt="" class="mr-1" height="21" loading="lazy" src="https://engn.ciwf.org/dist/assets/images/icons/icon-facebook-white.svg" width="11" />Share</a></div>
<div class="col-md-4"><a class="twitter" href="https://twitter.com/intent/tweet?text=I%20just%20helped%20farmed%20animals%20by%20donating%20to%20%40CIWF_USA.%20Will%20you%20do%20the%20same%3F%20http%3A%2F%2Fbit.ly%2F2BxKClx%20%23Compassion" rel="noopener" target="_blank"><img alt="" class="mr-1" height="20" loading="lazy" src="https://engn.ciwf.org/dist/assets/images/icons/icon-twitter-white.svg" width="25" />Tweet</a></div>
<div class="col-md-4"><a class="whatsapp" href="https://api.whatsapp.com/send?text=Ik%20help%20de%20dieren%20en%20heb%20zojuist%20gedoneerd%20aan%20Compassion%20in%20World%20Farming!%20Dieren%20in%20de%20vee-industrie%20verdienen%20een%20veel%20beter%20leven%20en%20verre%20veetransporten%20moeten%20worden%20verboden.%20Help%20jij%20ook%20mee%3F%20https%3A%2F%2Fbit.ly%2F2XX9mSJ" rel="noopener" target="_blank"><img alt="" class="mr-1" height="20" loading="lazy" src="https://engn.ciwf.org/dist/assets/images/icons/icon-whatsapp-white.svg" width="23" />Share</a></div>
</div>
To swap in email:
<div class="col-md-4"><a class="email" href="mailto:?subject=I%20just%20helped%20farmed%20animals%20-%20can%20you%3F&body=I%20just%20helped%20farmed%20animals%20by%20donating%20to%20Compassion%20in%20World%20Farming.%20Will%20you%20do%20the%20same%3F%20http%3A%2F%2Fbit.ly/2kmFk9m" rel="noopener" target="_blank"><img alt="" class="mr-1" height="20" loading="lazy" src="https://engn.ciwf.org/dist/assets/images/icons/icon-email-white.svg" width="23" />E-mail</a></div>

<div class="social-links row text-uppercase mt-4">
<div class="col-md-4"><a class="facebook" href="https://www.facebook.com/share.php?u=https%3A%2F%2Fdonate.ciwf.com%2Fpage%2F12128%2Fdonate%2F1%3Fsupporter.appealCode%3DAPFB_US1217%26utm_campaign%3Dfundraising%26utm_source%3Dsharedciwffb%26utm_medium%3Dfacebook" rel="noopener" target="_blank"><img class="mx-auto" height="21" loading="lazy" src="https://engn.ciwf.org/dist/assets/images/icons/icon-facebook-white.svg" width="11" /></a></div>
<div class="col-md-4"><a class="twitter" href="https://twitter.com/intent/tweet?text=I%20just%20helped%20farmed%20animals%20by%20donating%20to%20%40CIWF_USA.%20Will%20you%20do%20the%20same%3F%20http%3A%2F%2Fbit.ly%2F2BxKClx%20%23Compassion" rel="noopener" target="_blank"><img class="mx-auto" height="20" loading="lazy" src="https://engn.ciwf.org/dist/assets/images/icons/icon-twitter-white.svg" width="25" /></a></div>
<div class="col-md-4"><a class="whatsapp" href="https://api.whatsapp.com/send?text=Ik%20help%20de%20dieren%20en%20heb%20zojuist%20gedoneerd%20aan%20Compassion%20in%20World%20Farming!%20Dieren%20in%20de%20vee-industrie%20verdienen%20een%20veel%20beter%20leven%20en%20verre%20veetransporten%20moeten%20worden%20verboden.%20Help%20jij%20ook%20mee%3F%20https%3A%2F%2Fbit.ly%2F2XX9mSJ" rel="noopener" target="_blank"><img class="mx-auto" height="21" loading="lazy" src="https://engn.ciwf.org/dist/assets/images/icons/icon-whatsapp-white.svg" width="25" /></a></div>
</div>
To swap in email:
<div class="col-md-4"><a class="email" href="mailto:?subject=I%20just%20helped%20farmed%20animals%20-%20can%20you%3F&body=I%20just%20helped%20farmed%20animals%20by%20donating%20to%20Compassion%20in%20World%20Farming.%20Will%20you%20do%20the%20same%3F%20http%3A%2F%2Fbit.ly/2kmFk9m" rel="noopener" target="_blank"><img class="mx-auto" height="21" loading="lazy" src="https://engn.ciwf.org/dist/assets/images/icons/icon-email-white.svg" width="25" /></a></div>
<div class="social-links row text-uppercase mt-4">
<div class="col-md-6"><a class="facebook" href="http://www.facebook.com/share.php?u=https%3A%2F%2Fdonate.ciwf.com%2Fpage%2F12128%2Fdonate%2F1%3Fsupporter.appealCode%3DAPFB_US1217%26utm_campaign%3Dfundraising%26utm_source%3Dsharedciwffb%26utm_medium%3Dfacebook" rel="noopener" target="_blank"><img class="mr-1" height="21" loading="lazy" src="https://engn.ciwf.org/dist/assets/images/icons/icon-facebook-white.svg" width="11" />Share</a></div>
<div class="col-md-6"><a class="twitter" href="https://twitter.com/intent/tweet?text=I%20just%20helped%20farmed%20animals%20by%20donating%20to%20%40CIWF_USA.%20Will%20you%20do%20the%20same%3F%20http%3A%2F%2Fbit.ly%2F2BxKClx%20%23Compassion" rel="noopener" target="_blank"><img alt="" class="mr-1" height="20" loading="lazy" src="https://engn.ciwf.org/dist/assets/images/icons/icon-twitter-white.svg" width="25" />Tweet</a></div>
<div class="col-md-6"><a class="whatsapp" href="https://api.whatsapp.com/send?text=Ik%20help%20de%20dieren%20en%20heb%20zojuist%20gedoneerd%20aan%20Compassion%20in%20World%20Farming!%20Dieren%20in%20de%20vee-industrie%20verdienen%20een%20veel%20beter%20leven%20en%20verre%20veetransporten%20moeten%20worden%20verboden.%20Help%20jij%20ook%20mee%3F%20https%3A%2F%2Fbit.ly%2F2XX9mSJ" rel="noopener" target="_blank"><img alt="" class="mr-1" height="20" src="https://engn.ciwf.org/dist/assets/images/icons/icon-whatsapp-white.svg" width="23" />share</a></div>
<div class="col-md-6"><a class="email" href="mailto:?subject=I%20just%20helped%20farmed%20animals%20-%20can%20you%3F&body=I%20just%20helped%20farmed%20animals%20by%20donating%20to%20Compassion%20in%20World%20Farming.%20Will%20you%20do%20the%20same%3F%20http%3A%2F%2Fbit.ly/2kmFk9m" rel="noopener" target="_blank"><img alt="" class="mr-1" height="20" loading="lazy" src="https://engn.ciwf.org/dist/assets/images/icons/icon-email-white.svg" width="23" />E-mail</a></div>
</div>
<div class="social-links row text-uppercase mt-4">
<div class="col-md-12"><a class="facebook" href="https://www.facebook.com/share.php?u=https%3A%2F%2Fdonate.ciwf.com%2Fpage%2F12128%2Fdonate%2F1%3Fsupporter.appealCode%3DAPFB_US1217%26utm_campaign%3Dfundraising%26utm_source%3Dsharedciwffb%26utm_medium%3Dfacebook" rel="noopener" target="_blank"><img alt="" class="mr-1" height="21" loading="lazy" src="https://engn.ciwf.org/dist/assets/images/icons/icon-facebook-white.svg" width="11" />Share</a></div>
<div class="col-md-12"><a class="twitter" href="https://twitter.com/intent/tweet?text=I%20just%20helped%20farmed%20animals%20by%20donating%20to%20%40CIWF_USA.%20Will%20you%20do%20the%20same%3F%20http%3A%2F%2Fbit.ly%2F2BxKClx%20%23Compassion" rel="noopener" target="_blank"><img alt="" class="mr-1" height="20" loading="lazy" src="https://engn.ciwf.org/dist/assets/images/icons/icon-twitter-white.svg" width="25" />Tweet</a></div>
<div class="col-md-12"><a class="whatsapp" href="https://api.whatsapp.com/send?text=Ik%20help%20de%20dieren%20en%20heb%20zojuist%20gedoneerd%20aan%20Compassion%20in%20World%20Farming!%20Dieren%20in%20de%20vee-industrie%20verdienen%20een%20veel%20beter%20leven%20en%20verre%20veetransporten%20moeten%20worden%20verboden.%20Help%20jij%20ook%20mee%3F%20https%3A%2F%2Fbit.ly%2F2XX9mSJ" rel="noopener" target="_blank"><img alt="" class="mr-1" height="20" loading="lazy" src="https://engn.ciwf.org/dist/assets/images/icons/icon-whatsapp-white.svg" width="23" />Share</a></div>
</div>
To add or swap in email:
<div class="col-md-12"><a class="email" href="mailto:?subject=I%20just%20helped%20farmed%20animals%20-%20can%20you%3F&body=I%20just%20helped%20farmed%20animals%20by%20donating%20to%20Compassion%20in%20World%20Farming.%20Will%20you%20do%20the%20same%3F%20http%3A%2F%2Fbit.ly/2kmFk9m" rel="noopener" target="_blank"><img alt="" class="mr-1" height="20" loading="lazy" src="https://engn.ciwf.org/dist/assets/images/icons/icon-email-white.svg" width="23" />E-mail</a></div>
<div class="col-md-4"><a class="facebook" href="http://www.facebook.com/share.php?u=https%3A%2F%2Fdonate.ciwf.com%2Fpage%2F12128%2Fdonate%2F1%3Fsupporter.appealCode%3DAPFB_US1217%26utm_campaign%3Dfundraising%26utm_source%3Dsharedciwffb%26utm_medium%3Dfacebook" rel="noopener" target="_blank"><img alt="" class="mr-1" height="21" loading="lazy" src="https://engn.ciwf.org/dist/assets/images/icons/icon-facebook-white.svg" width="11" />Share</a></div>
<div class="col-md-4"><a class="twitter" href="https://twitter.com/intent/tweet?text=I%20just%20helped%20farmed%20animals%20by%20donating%20to%20%40CIWF_USA.%20Will%20you%20do%20the%20same%3F%20http%3A%2F%2Fbit.ly%2F2BxKClx%20%23Compassion" rel="noopener" target="_blank"><img alt="" class="mr-1" height="20" loading="lazy" src="https://engn.ciwf.org/dist/assets/images/icons/icon-twitter-white.svg" width="25" />Tweet</a></div>
<div class="col-md-4"><a class="email" href="mailto:?subject=I%20just%20helped%20farmed%20animals%20-%20can%20you%3F&body=I%20just%20helped%20farmed%20animals%20by%20donating%20to%20Compassion%20in%20World%20Farming.%20Will%20you%20do%20the%20same%3F%20http%3A%2F%2Fbit.ly/2kmFk9m" target="_blank"><img alt="" loading="lazy" height="20" src="https://engn.ciwf.org/dist/assets/images/icons/icon-email-white.svg" width="23" />E-mail</a></div>
<div class="col-md-4"><a class="whatsapp" href="https://api.whatsapp.com/send?text=Ik%20help%20de%20dieren%20en%20heb%20zojuist%20gedoneerd%20aan%20Compassion%20in%20World%20Farming!%20Dieren%20in%20de%20vee-industrie%20verdienen%20een%20veel%20beter%20leven%20en%20verre%20veetransporten%20moeten%20worden%20verboden.%20Help%20jij%20ook%20mee%3F%20https%3A%2F%2Fbit.ly%2F2XX9mSJ" rel="noopener" target="_blank"><img alt="" class="mr-1" height="20" loading="lazy" src="https://engn.ciwf.org/dist/assets/images/icons/icon-whatsapp-white.svg" width="23" />Share</a></div>
If you want to include an Instagram button asking people to follow your account (not share, this is not currently possible), then you can use the below code, please ask if you need help including this in your content
With text:
<div class="col-md-4"><a class="instagram" href="https://www.instagram.com/ciwf" target="_blank"><img alt="" class="mr-1" height="21" loading="lazy" src="https://engn.ciwf.org/dist/assets/images/icons/icon-instagram-white.svg" width="21" />Share</a></div>
Icon only:
<div class="col-md-4"><a class="instagram" href="https://www.instagram.com/ciwf" target="_blank"><img alt="" class="mx-auto" height="21" loading="lazy" src="https://engn.ciwf.org/dist/assets/images/icons/icon-instagram-white.svg" width="21" /></a></div>
Share settings
Only the settings tabs listed below will work for our pages, the others will not because we use our own custom share buttons.
Social details > Settings in the right-hand sidebar,
General tab - Here you can define the title and description for Facebook sharing. You can also select the photo to display if the image you want to use is not the main image already on the page.
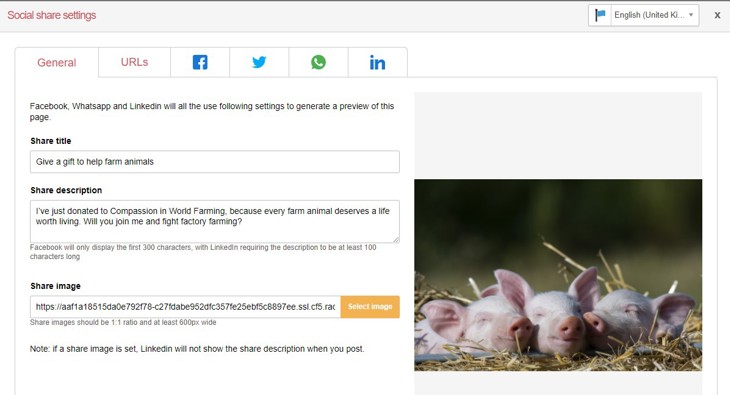
Facebook (debug) tab - Once a Facebook share URL is visited it is cached. This means that if you change the general tab settings after clicking the Facebook share URL, Facebook will not immediately register your changes and might show your old image/description. You need to tell Facebook to re-cache it.
Click the “Debug” which will open up Facebook’s sharing debugger. On this page, you can “Scrape again” the URL and it will take another look at your page and display a sample post. Often you need to press this a number of times for it to show properly. You will need to save the share settings and the page before you see the changes.
Twitter tab - the first section for the tweet text will not do anything because we don't use EN's share buttons. However, you can toggle-on the 'Twitter card details' section and define the Twitter card content to display if someone shares the URL of the page.
If you don't select an image here, the main image on the page will be used. If you do, remember to include the alt text.
The preview button at the bottom takes you to the Twitter card validator, you need to save the share settings and then the page before you will see your changes there.
Reference the email building guide for notes on how to create share messages for sharing buttons.
Closing pages
To close and redirect a page:
- Click the cog settings icon to manage your page settings
- Change the page status to "closed" using the dropdown list
- Scroll down in the settings to the section "Closed landing page:" and select "Closed URL"
- Paste the URL (with tracking if necessary) of the page you want to redirect to, in the empty URL field. Save.
- Test that the redirect is working correctly by visiting the URL of the closed page.
- Move the closed page to the Closed pages folder in your account
Thank you emails
Please see our guide on EN page thank you autoresponder emails.
Mandatory parameters
All fields on action pages must now be set as non-mandatory in the form block, regardless of whether you want to the field to be mandatory or not.
First name, Last name, Email address
Using Javascript on our pages, these three fields are always mandatory on every page, and should always be present in your forms.
To make other fields mandatory (excluding phone number)
When adding additional fields to an action form, they must be set to non-mandatory in the EN form block. These fields can be made mandatory with a code block added to page 1.
In your library you have a code block called 'Action Variable - Additional Mandatory Fields'. Adding this code block to the bottom of your page will make the three fields in yellow mandatory, but only if the fields are in the form, if they are not present on the page then nothing happens.

If you need something different than this, e.g all three fields are in your form but you only want two of them to be mandatory, or you are using another field not mentioned, then we recommend asking us to set this up for you because the variable code used here requires specific semantics in order to be valid. However, you can find instructions below:
If you do not want all three fields to be mandatory - unlink the text block from the library and delete the name of the field from the list - including it's quotation marks and subsequent comma.
Note that country (and region for US) are not included here because these dropdown fields will always have a value and therefore do not need to be mandatory.
Here are the field names if required:
"supporter.address1"
"supporter.address2"
"supporter.city"
"supporter.postcode"
The final item in the list must not be followed by a comma.
To make additional fields mandatory, unlink the code block and then locate the field name by inspecting the page and add it to the list. Again, please do ask us for help for with this if needed.
Hidden action landing page fields
In order to pass an appeal code from an action page to a donation page redirect, you need to include the two hidden fields on the landing page. ‘appealcode’ and ‘Temp Appeal Code’. These fields should not be edited.
This form block is saved in your library as ‘Hidden appeal codes for action landing pages’. If this is not already on your page, drag a form block onto the page and load this from the library. Do not unlink it!
Troubleshooting
- The Social Proof RollCall total number is blank
Check that you have a progress bar on the page and that you have not removed the <span> and ID by mistake. - US ETT forms won't accept the short version of zip code: remove the target, save, and re-add the target, save. EN bug that mostly happens with the senate databases.
TWITTER CARD NOT SHOWING AN IMAGE
- If sharing an EN page make sure there is an image inserted in the social share section of the EN page at the correct size Min 600px wide and ratio of 1.91:1
- Use the Scrape function in the EN page Social Details Facebook Tab. Ensure it generates the message and image saved in the general tab
- Make sure the page being shared is in Live mode
- Share on Facebook - you can set the post to share privately so the public won't see it.
- Make sure that the message does not exceed the max character count of 280 including spaces.


