Introduction
This document shows the email designs available to customise digital communication emails. Part two explains how to build and produce emails.
This document covers broadcast emails, for thank you auto-responder emails please see this guide.
Email Building Dos and Do Nots
NB: Please be aware that at the moment any URLs with over 400 characters will not recieve click tracking in EN.
- Do draw attention to copy using one or a combination of bold, italics, capitalisation or impact blocks. Or break text up using subheadings formed by H2's and H3's
- Do keep links on text to cover the key action words, avoid making whole sentences a link or using meaningless words like "click here".
- Do keep H1 Titles to two lines when viewed on desktop. Titles cannot contain words longer than 15 characters.
- Do not make subtitles hyperlinks.
- Do not write subheadings in all uppercase. Sentence case or title case should be used.
- Button titles should not be more than two lines when viewed on mobile.
- Orange buttons are for donation links. Green buttons for CTA and everything else.
- Do not use images with text overlaid. Use captions and subtitles to illustrate image information.
- Image and text block allows for the copy to sit the right or left of a small image. Note that it will not wrap.
- Content blocks with green and black backgrounds: avoid using this for long paragraphs of text, this should be used more for creating impact/breaking up content.
- Add spacers to create space between blocks. Do not double up spacers. You can adjust the height of the spacers but keep them uniform throughout the email.
Duplicating blocks
The ability to duplicate blocks within an email is coming.
Dynamic Blocks and Split Tests
There will be an improvement to allow the combination of dynamic content with split tests. You cannot have empty dynamic content for audience segments. If you want to have segments that just don't see a piece of content, use Audience Segments to create alternate email content.
Preview Text
The preview text field has a limit of 255 characters, however, when you include diacritical characters (e.g. ź) these also count as characters so will significantly reduce the char limit on the field. It has been requested that these do not get counted as characters and that the fields are marked with helpful character max info.
Reporting - Split Tests
Currently split test reporting for A/B tests show you an identical email in the mini preview, if you hover on the name of the test variant you can see the changes - this experience will be improved.
Reporting - Time Zone
We have requested EN to enable us to change the time zone of the reporting tool.
Segments
Once you have added an audience segment to your message, and saved your segment message, you cannot change the segment without deleting the entire message and starting the version again. A solution will be coming for this.
Inserting a non-breaking line space
Hack for nbsp; which was previously inserted to the html code. Use ctrl + 255 (on the numeric keypad) it inserts one! You have to use a keyboard with a numeric keypad for it to work.
How To Build An Email
Log into Engaging Networks with your credentials selecting the country account you wish to work in.
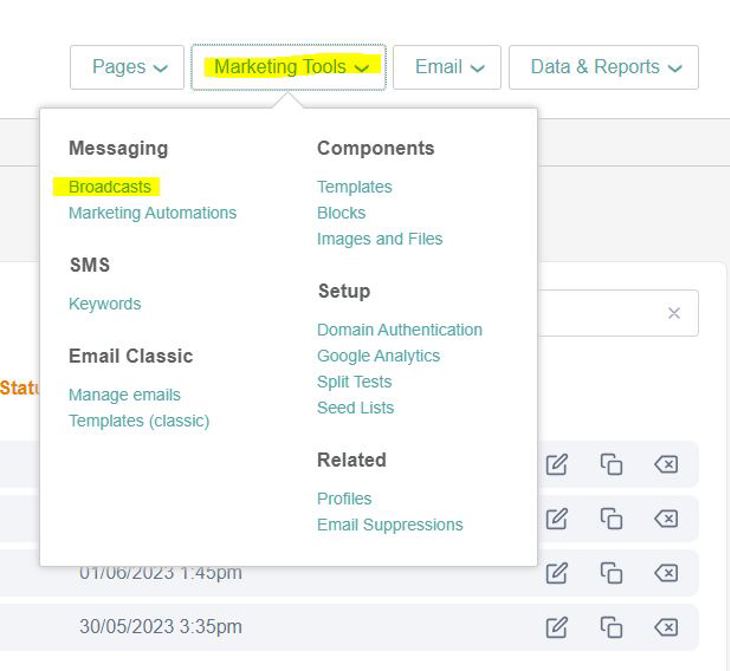
Select MARKETING TOOLS > BROADCAST.
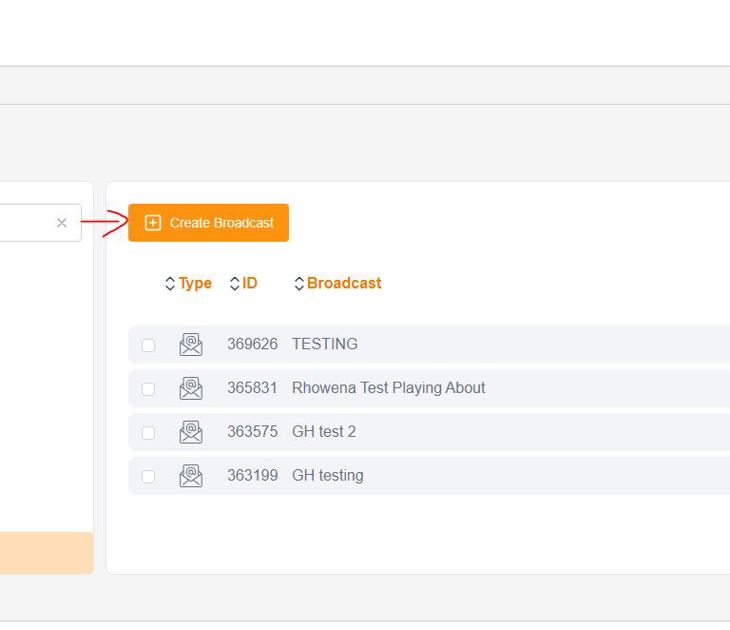
Locate the orange button CREATE BROADCAST
Make the appropriate selection for the type of email required and give it a unique name using the EN Naming Convention sheet to create consistent naming. There is a tab for each country office.
The appeal code entered should be the one used for the email campaign eg APEM_ES1023. If there are multiple segmented codes for the purpose of audience segmentation or different landing pages in the email campaign, the campaign name appeal code entry should ignore segment letters.
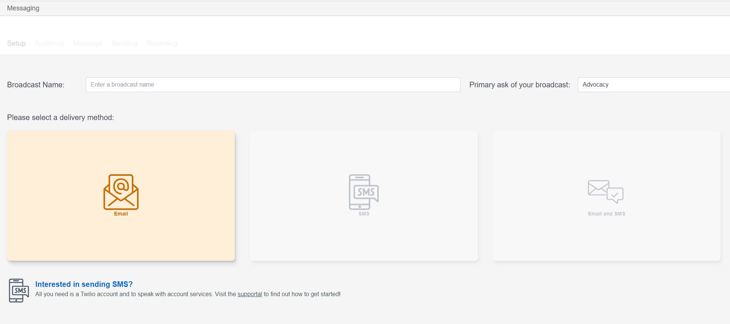
Enter the created email campaign name in the "Broadcast Name" field, and select an appropriate option from the "Primary ask of your broadcast" drop-down menu.
- Advocacy = campaigning, data capture, events
- Engagement = Stewardship type emails which are mainly informative, Christmas cards / shop / book sales / competitions / general and good news and updates (can include soft donation or action asks or no donation ask or action ask), re-engagement, reactivation,
- Fundraising = Appeals, Shop, Gift Aid/Gift Through Salary/Legacy/Upgrade/Lottery/Raffle
- Newsletter = Emails with a collection of stories
Audience Selection:
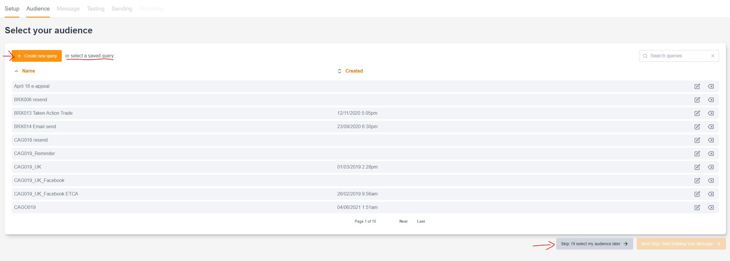
You can select the overall audience you wish to send the email campaign to using the query builder by clicking on CREATE A NEW QUERY.
Alternatively, select an existing saved query from the list displayed or you can SKIP AND SELECT AUDIENCE LATER using the grey button on the lower left-hand side.
Message
Select the template for your campaign by clicking START FROM TEMPLATE. Always work from templates, don't duplicate old emails as these will have code that goes out of date and will result in broken templates or out-of-date information. There are a few exceptions when you can duplicate from an email but 99% of the time you will make your email from a template we have provided under YOUR TEMPLATES. Click SELECT TEMPLATE button in the bottom left corner. Never use the sample templates as these are not CIWF branded.
Settings
In the right-hand menu under SETTINGS, fill in the fields for subject, preview, sender name etc. Ignore the field titled Tracking Parameter.
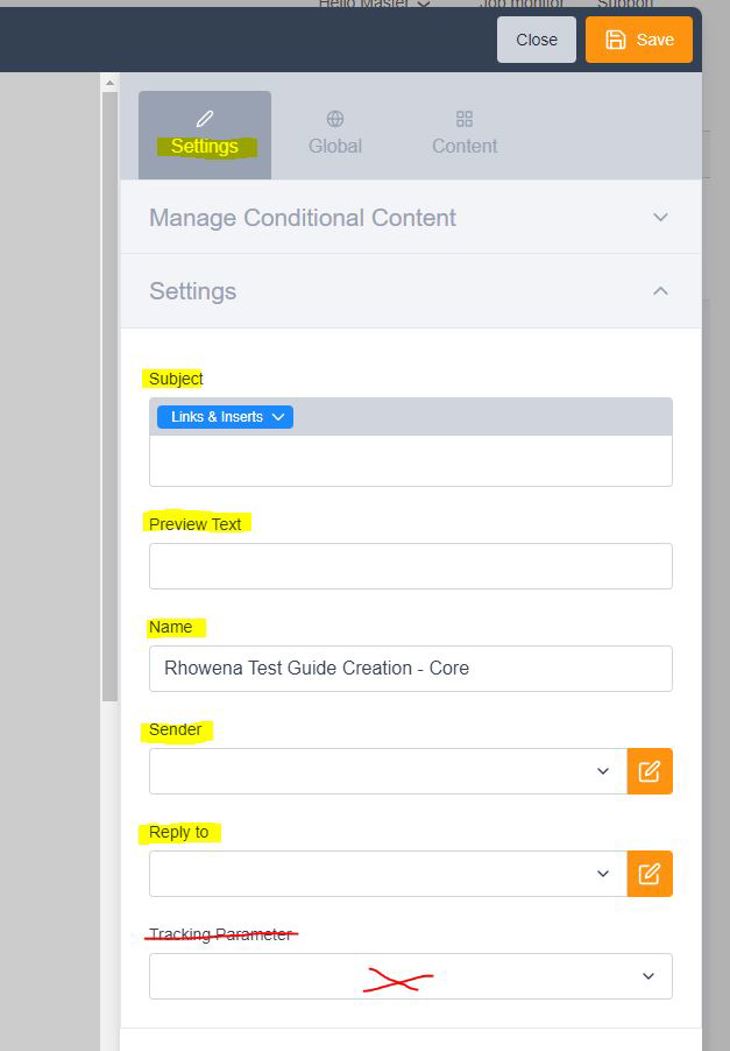
Subject line: industry recommendations say subject lines should be between 30-60 characters in length. It's important to understand your audience and make it something clear and engaging that will make a supporter want to open the email.
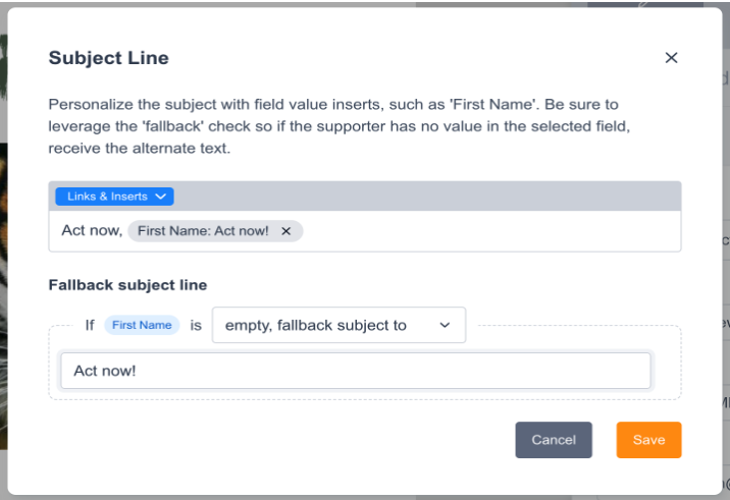
You can personalise a subject line and set fallback values if the data is not available. Unfortunately, the fallback subject line does not work in testing. To verify it you need to send a live test.
Preview text: this should be an extension of the subject line and provide more information about what the email contains, or a call to action. Ideally between 40-50 characters.
Sender: select the appropriate sender option, they should all follow a consistent format and if a personalised first name is used in the sender address, this should match the signature used in the email content.
Reply To: If you have an option in this menu other than "Same As Sender" use that, it will be specific to your office domains that have been set up by the digital team. Otherwise, use "Same As Sender"
Global - Logo Selection and CTA Button Options
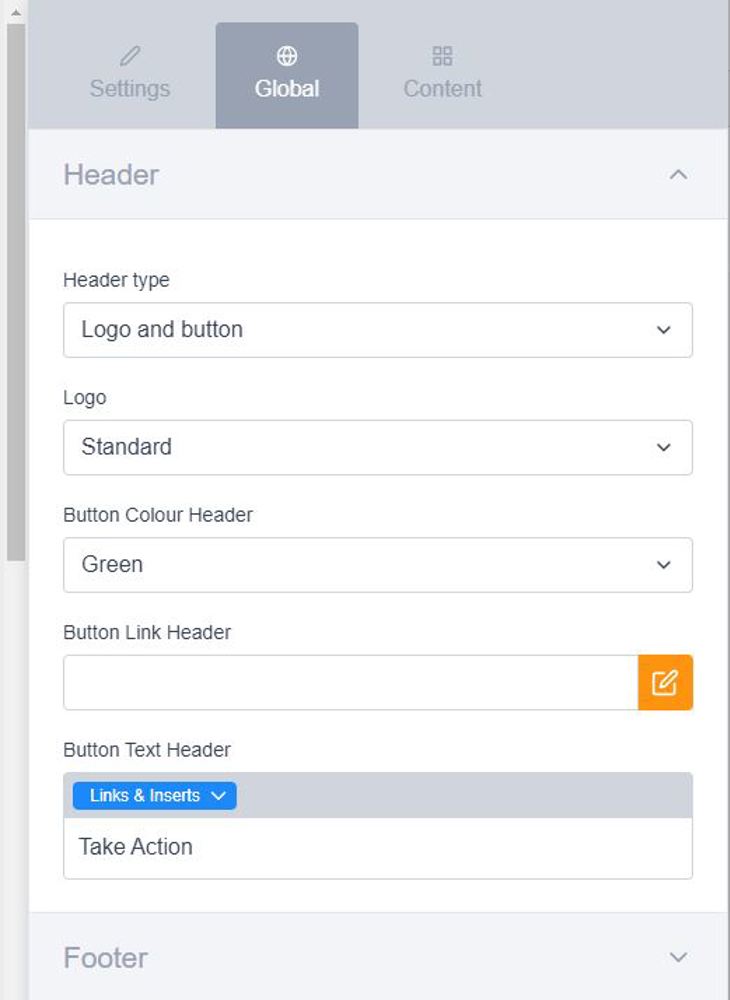
Under the GLOBAL tab, there are two sections for customising the header and footer area of the email.
Logo Selection
You can select which logo you want to apply. There are two options, normal and pride. The pride logo should be displayed on all broadcast emails that are sent during the month of June.
Content
Click on any of the blocks already in the email template to select it. Click on the "+" symbol to add new blocks and open the block library.
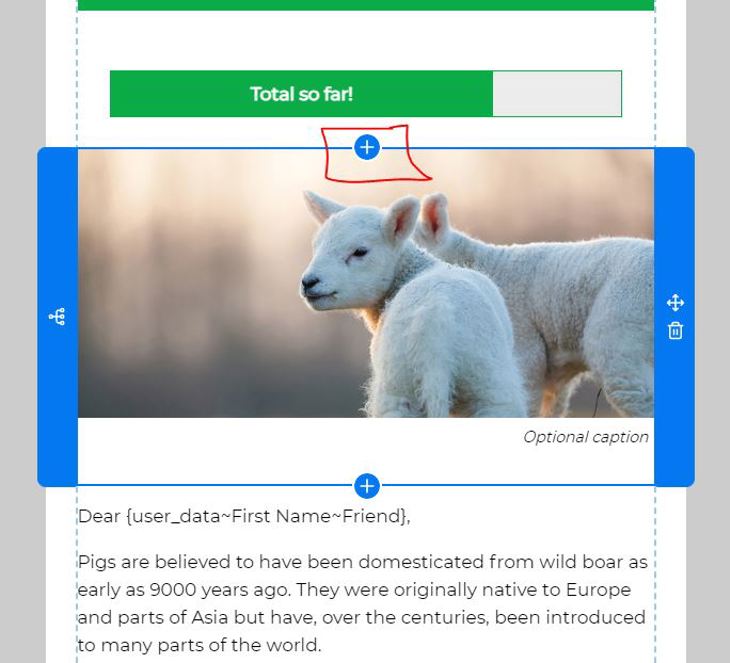
Blocks are organised into folders and there are thumbnail previews of what the blocks look like. Select the one you want and click "INSERT BLOCK".
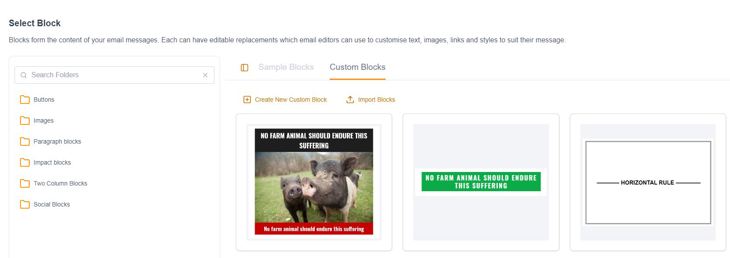
You can move blocks around by clicking and dragging the arrow symbol. Delete a block from the email by clicking on the trash can icon.
Call To Action Header/Footer Buttons
Header and footer call-to-action buttons can be added/edited/removed as a content block within a small editable section of the header/footer.
The dotted line indicates a section where you can add a content block:


Edit, remove or make the button dynamic like any other content block
There is a content block called "Header/Footer Button" in the home folder of your content blocks - this is the ONLY content block that should be added to the header and footer.
NB: This gap you see in the footer when you choose not to add a button will not be present in the email itself, this is only visible when you are viewing the email in email builder and it represents the container for adding blocks.
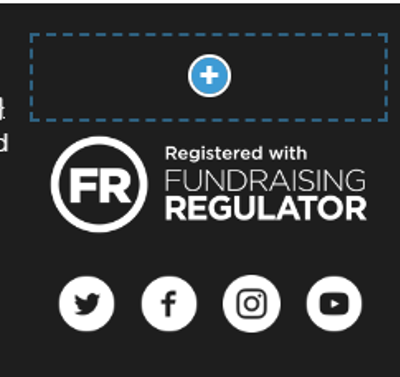
The default appearance of this block is the same across all of your account templates which have a header/footer button present. If you have a fundraising focused template for example, the button will be green by default and you will need to change it to orange when editing the email.
Use the Orange button for all donation-related links and Green for all other types of links. See notes on creating links to add links on buttons.
H1 Heading
In the right-hand menu, under the CONTENT tab, customise the text in the text field, write the title in sentence case, do not type in capitals. Capitalisation is added automatically applied through CSS (Custom Style Sheets). Keep individual words 15 characters or less otherwise the template breaks.
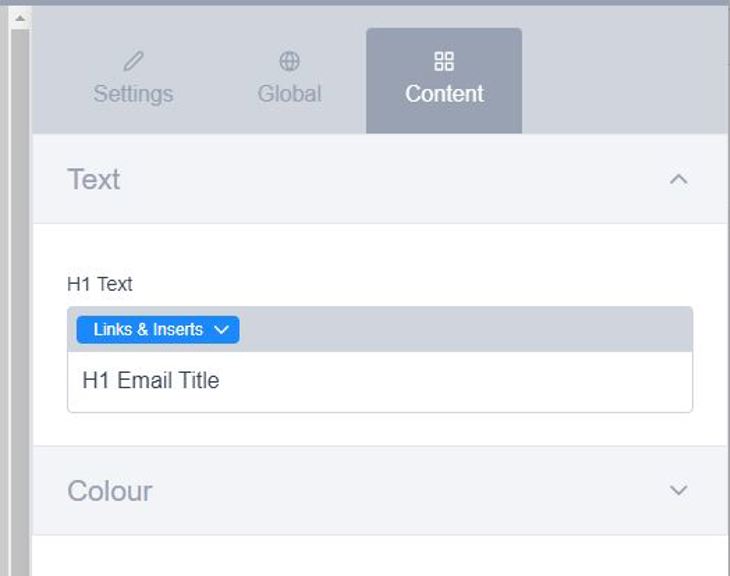
Keep headings and sub-headings short and concise. The H1 heading should not display on more than two lines when viewed on desktop.
Select one of the three background colours for your heading from the colour option in the right-hand menu.
Sub-headings
Use the text editor to add sub-headings to your email content. Sub-headings can be centered or left-aligned as preferred.
For accessibility reasons, they should:
- be written in sentence or title case.
- should not be hyperlinked *
- must be nested in order
* There is an exception to hyperlinked sub-headings for E-News content teasers. These titles should be kept short and describe the content it points to for accessibility. There is a block in the library specifically for this purpose.
Images
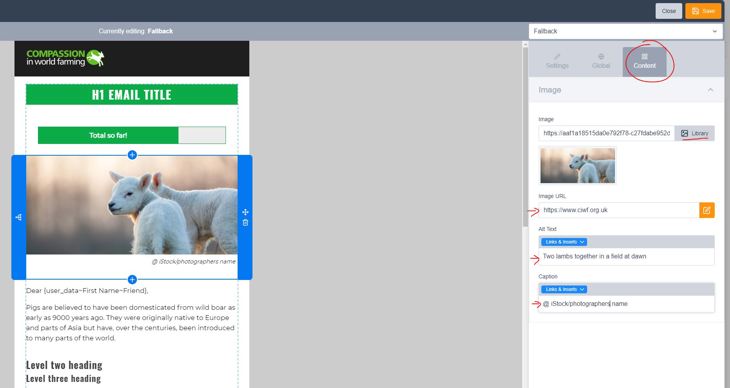
Select a new image from the right-hand menu in the CONTENT tab. Click on the LIBRARY button and either upload a new image or select an existing one.
It can be helpful to keep the image library organised so email images are separated from landing page images. All images used for email should be max 200kb file size when possible
Images don't need to be pre-sized, but they do need to meet the minimum width requirement for the block. Depending on the block being used landscape or portrait cropping should be used:
- Full width images & main story image – min width 660px max 1000px (suggested width 800px), landscape
- Half width images (2-col) – min width 500px max 700px, portrait to square format
- GIF files should be no more than 1 MB in size and have a width of either 660px or 500px depending on block placement
- Donation impact – width 500px, landscape
- Follow block – width 500px, landscape
- E-News Summary List: Portrait width 500px by 600px high
- Signature images: Portrait 200px wide by 240px high
Do not blow images up to fit the minimum size requirements and ensure images are sharp and of high quality. Using degraded images, blurry images reflects poorly on our professionalism and undermines the message we are conveying.
Fill in the text fields to populate the alternative text, add a link if one is desired (recommended to include one where possible as images often get clicked on), and an optional caption. The caption can be used to display photo credits if required or left empty if no caption is needed.
Uploading new images to the library
If uploading from within the email builder, you need to have the folder you want to upload to selected before you click upload. Control is quite limited when accessing the library this way.
Upload JPEG images, unless it's a logo then it should be a PNG. You have the option to upload and save as new or overwrite an existing image. Drag and drop the image you want to upload into the loader space.
Otherwise, you can upload images to the library by going to Pages > Components. You will have more control here with the ability to create folders, organise images and add alternative text at the library level.
Select a folder to save the new image into it from the dropdown menu and click "UPLOAD" to upload new images. If a folder doesn't already exist for email images create one.
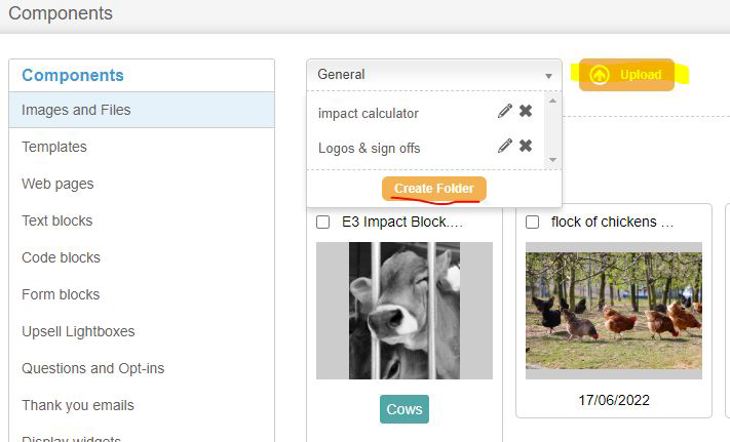
Add alternative text for the image. Adding alternative text to the image in the library will automatically populate for the image block in the email.
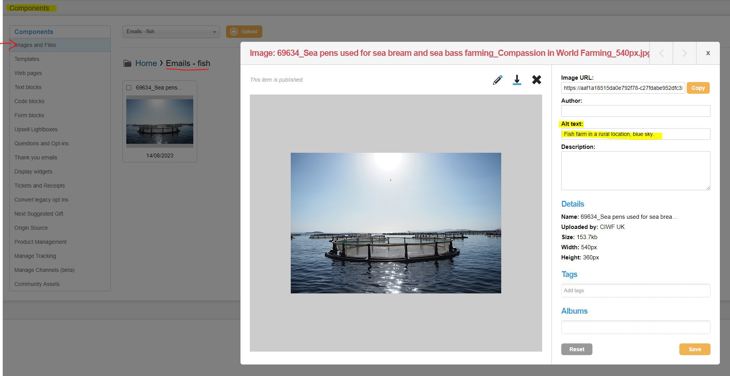
It’s important to give all images an Alt tag name both in Engaging Networks library and in the source code of the email. Alt descriptions should describe how the image looks. In the case that someone could not see the image they would know what it was by reading the alt description. Giving images Alt descriptions also improves SEO (search engine optimisation).
Please complete this training course on how to create good alt-tag descriptions. Request a Site Improve log in from Digi Team to access if you don't have access already.
In our Accessibility guide you can also use the Alt Tag Decisions Tree to help you with how to correctly tag your images.
Links On Images
!IMPORTANT! Links on images should be added in the same way as any other types of links. See notes on creating links.
Text On Images
Please avoid overlaying images with text. Especially informative text. It's important to consider that not all of our audience will have good vision, some may be using screen readers, have images turned off and over 50% of our audience read our communications on mobile devices.
Overlaying text on images is bad practice for accessibility reasons. Our content should be accessible - everyone should be able to consume it, we want everyone to know how awful factory farming is, and we don't want anyone to feel excluded from this. We want to have a reputation for providing accessible content. Or at least, not have a reputation for not doing so. So this means we need to consistently produce accessible content, and not make any exceptions.
For those viewing images it is still a problem. While the text is legible on a desktop/laptop it's not easy to read on a mobile. The text sizing will not auto-adjust for the device, it will be fixed and simply reduce in size resulting in the text on the images being illegible on smaller screens. Over 50% of people read their emails on mobile devices.
Images with accompanying text should be in captions or subheadings below the image. They could be h2 and h3's respectively and centered to give them some style if desired. There are also impact blocks and infographics that are designed with accessibility in mind and are a great way to display images with short excerpts of text to make a point.
Paragraphs
Use the text editor to add copy to your email from the Content tab in the right-hand menu.
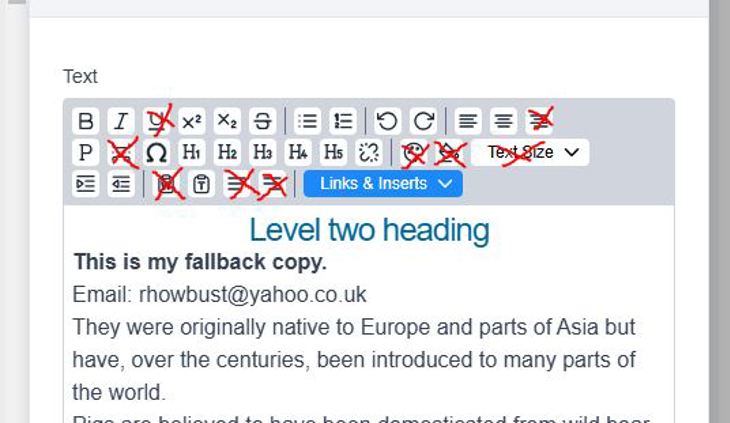
When copying and pasting text always paste as plain text. Otherwise, you will copy in formatting that is not desired and break the template. Right-click the mouse and select Paste as plain text from the menu or use the keyboard shortcut CTRL + SHIFT + V. There is also a "T" icon in the toolbar you can use to paste as plain text.
Use the heading options to create sub-headings. Be careful to correctly nest headings in order. There should only be one H1 in the email, the main heading near the top.
Do not use the crossed-out editor buttons.
- We never right-align text.
- Use the library block to create horizontal rules.
- Body copy should always be left aligned.
- Subheadings can be centred or left-aligned as preferred.
- Do not use underline to draw attention to something, underline is used for links only.
- Do not make whole paragraphs of text bold or italic, keep to a few keywords or a sentence. Use impact blocks to make longer sections of body copy stand out.
- Use the blue "links and inserts" button to add hyperlinks and personalisation.
- Do not change the size of text or add colours
- For accessibility, hyperlinks should be placed on meaningful words that indicate what the link will point to and they should be kept short due to legibility.
Select background colours for the block and change the text colour as appropriate using the options available in the "Content tab - Block" settings.
Special characters can be inserted using the Omega icon in the tool tray. Select the special character required from the popup menu.
Lists
There are styled list blocks available to use from the library.
- Green bullets
- Green numbered
- Green tick
- Red cross
To add more items to the list hit the return key after the previous item in the text editor. Highlight and backspace to remove ones you don't need.
IMPORTANT! These blocks should not contain other types of content such as additional paragraphs or anything else.
There are some known display issues:
- Outlook 365 desktop shows them all as black bullets
- Outlook webmail and app shows them as bullets but with the correct red/green colour
You may also use the text editor list option if preferred. These will display black bullets or numbered lists.
Using approved emoji or custom icons to create a custom list look is fine but will be created as paragraphs and will not be an HTML list item.
Image with text and optional button blocks
There is functionality for a small image with text next to it which can be left or right-aligned. Care should be given to the amount of text next to the image so that it fits the height of the image. The text will NOT wrap around the image.
See the section above on image size recommendations and guidelines.
Blocks come with a button display option which can be turned on or off. Buttons can be customised for colour and alignment.
When stacking several image text blocks using alternate arrangement of display ensure that the mobile view creates a text followed by image sequence. Use the reverse stack block options.
In this example email the following blocks were used to create the correct display for mobile stacking:
This is the order of blocks needed to have the desired display:
2-Col Reverse Stack: Img Right/Top
2-Col image left
2-Col Reverse Stack: Img Right/Top
Impact Blocks
Blocks with black or green backgrounds should only use white text. Blocks with white backgrounds should use black text. Do not use green text on black backgrounds. This is not accessible, there is not sufficient colour contrast.
Do not use long paragraphs of text in these blocks. They should be used to create impact and draw attention to small sections of content.
Spacers
Include single spacers between blocks that do not have built-in spacers (most blocks do not). Do not double up on spacers, keep spacing even throughout the email.
Spacer blocks that can have their height customised, note that if you set the height lower than 20px it won't look like it's working in email builder, because EN gives blocks a minimum height for ease of building, when you preview the email you will what you expect to see.
If adjusting the height of the spacers keep the height of spacers consistent throughout the email to create even spacing.
Buttons General
To edit the text on the button use the editor fields in the right-hand menu to customise the title, colour, alignment and add a link. Titles should be written in sentence case, the CSS (Custom Style Sheet) will automatically style the titles to be capitalised.
Orange buttons are to be used for donation and fundraising-type links only. Green buttons should be used for everything else.
Keep button titles meaningful, short concise calls to action. These titles should not be long sentences. Button titles should span more than two lines when viewed on mobile.
Donation Impact Buttons
When using the donation impact module, or creating a Donate Buttons that stipulates a pre-set donation amount and/or frequency, for example, 'Donate £15 Monthly' the link should represent this value.
When generating the tracked url in the SalesForce URL Generator use the Optional URL Parameters section to add the extensions for each button accordingly.
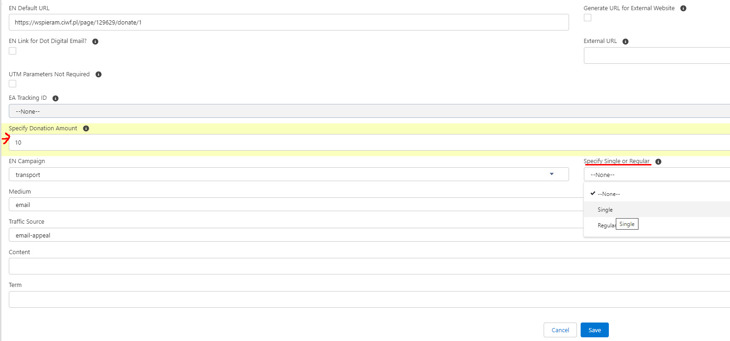
Below are examples of how the links will look without utm tracking added so you can see clearly the result. You will need to add the appropriate url tracking for your links.
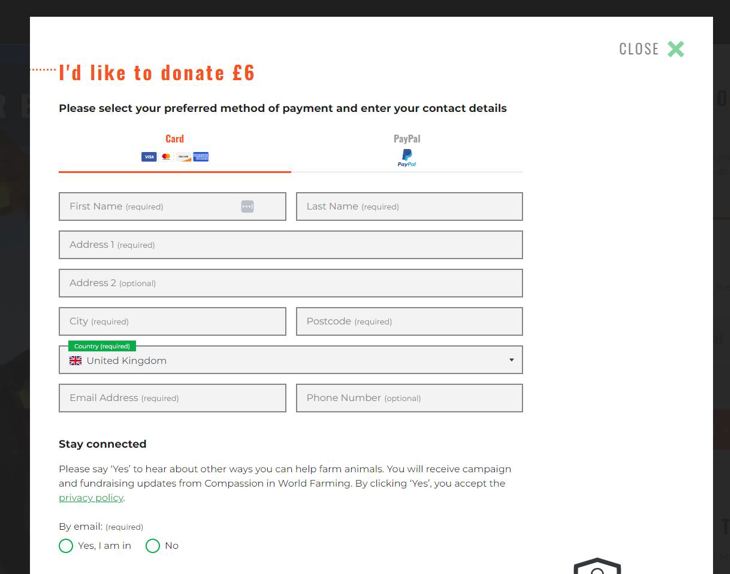
Pop Up Pre-Set Monthly
https://donate.ciwf.org.uk/page/8027/donate/1?transaction.recurrpay=Y&transaction.donationAmt=15
So "transaction.recurrpay=Y" will open the pop up monthly and "transaction.donationAmt=15" will put the amount 15 in the popup
Pop Up Pre-Set Single
https://donate.ciwf.org.uk/page/8027/donate/1?transaction.recurrpay=N&transaction.donationAmt=6
So "transaction.recurrpay=N" will open the pop up single and "transaction.donationAmt=6" will put the amount 6 in the popup
Adding Links
Links Pointing to Engaging Networks Pages
To add a hyperlink on any image, text, or button that will point to an Engaging Networks action/donation/data capture page;
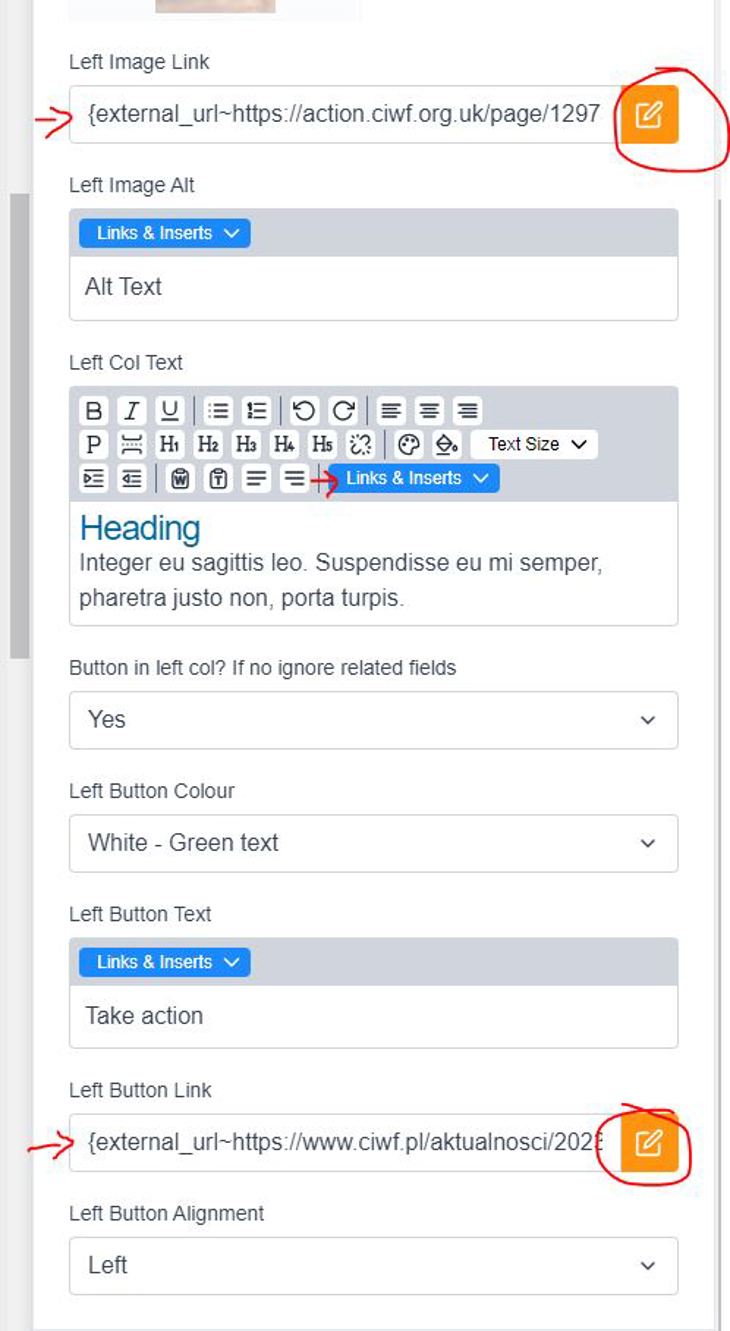
Select the image, button or text you want to add a hyperlink to. Select "INSERT PAGE LINK" from the "LINKS AND INSERTS" dropdown menu in the text editor or click the yellow editor icon next to the insert link field.
Add a link name using the format guide. This is important for reporting and understanding better what gets clicked on and where in our email communications.
Header and Footer Buttons
Select the appropriate option depending on the purpose of the button and placement:
- btn_action_header
- btn_donate_header
- btn_action_footer
- btn_donate_footer
Copy and past the appropriate image link name from the list.
Body Content
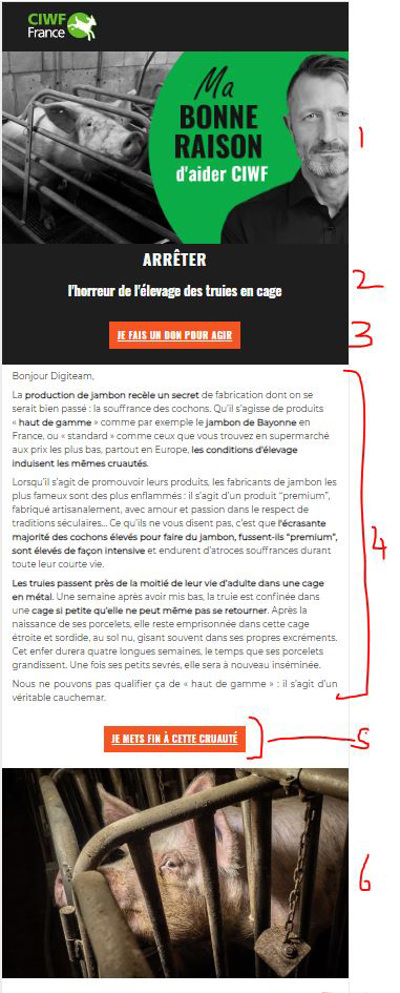
Identify the piece of content the link is on eg Image/button/text or use the shorthand abbreviation img/btn/txt.
Identify module eg header=1, module below header = 2 etc.
Add a content descriptor value that identifies the placement in the email eg image description/title on the button/words with the hyperlink.
The format will end up like this for the image of pigs in the screen grab example: "image_6_pigs" or "img_6_pigs". The first button would be "btn_3_Je Fais Un Don Pour Agir" or it could be "button_3_Je Fais Un Don Pour Agir"
If there are multiple text hyperlinks in a paragraph block they should be differentiated by the final part of the name, the module number staying the same for both.
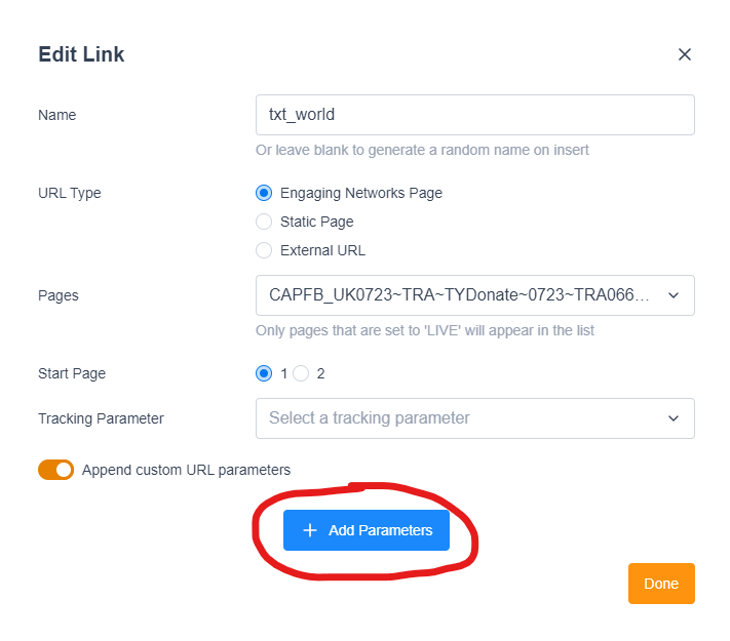
Select URL Type Engaging Networks. Then choose the Engaging Networks page you want to link to from the drop-down menu.
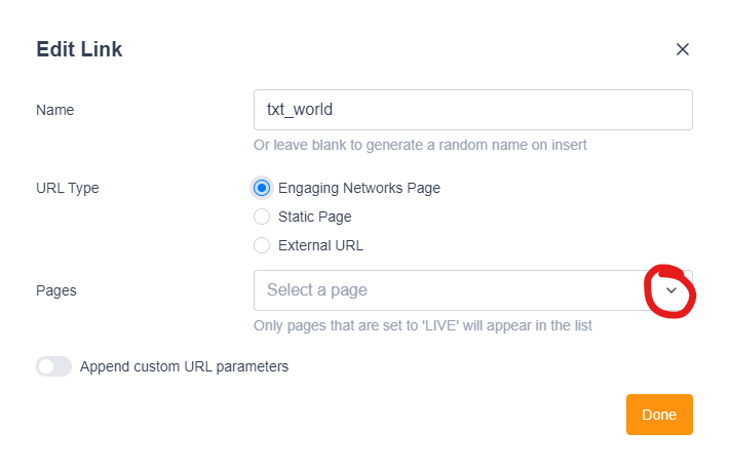
Then toggle on the Append Custom URL Parameter feature. Click Add Parameters button (do not use the tracking parameter dropdown)
Click on the button titled "PASTE CUSTOM PARAMETERS"

Copy the tracked link created in the Sales Force generator.
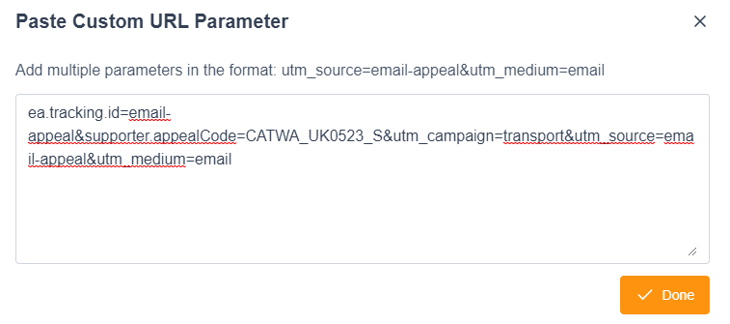
Click "DONE". The system will automatically populate the fields as shown in the screen grab but we don’t use this section. Click "DONE" again.
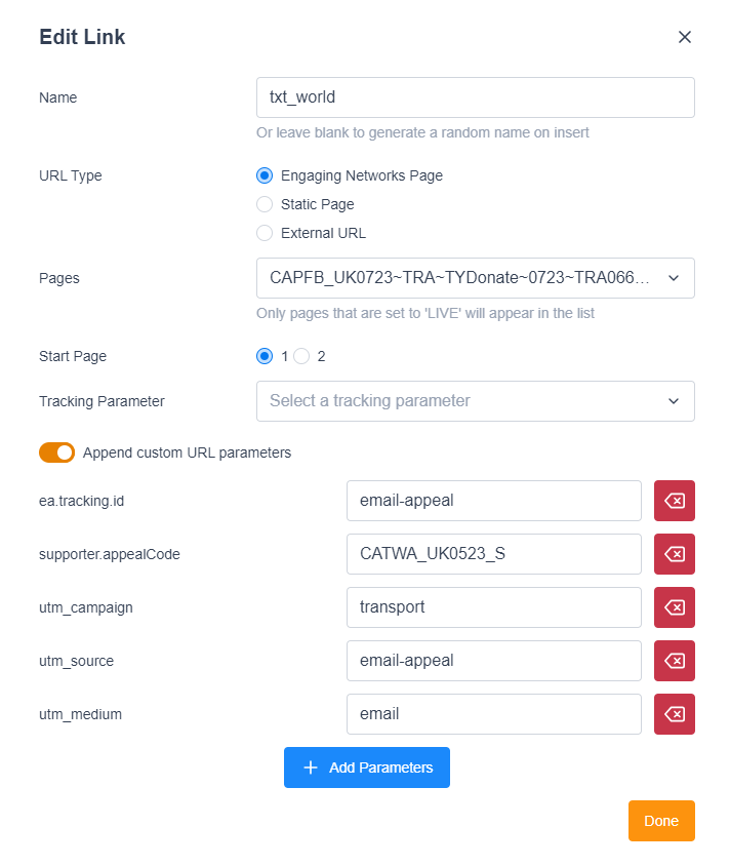
To edit a tracked URL if there is a mistake, it is best to remove all existing parameters with the red delete buttons. Make the campaign link an external link, any url will do. Save it. Then follow the steps again to add a campaign link to an EN page, otherwise, you risk errors.
External links - Non-Engaging Networks Pages
To add a hyperlink on any image, text, or button that will point to a CIWF website page or any other website page that is not an Engaging Networks action or donation page:
Insert a link name using the naming convention described above.
Select "EXTERNAL LINK". Here "external" means external to Engaging Networks. Simply paste the utm tracked URL from the Google Tracking Analytics sheet or the URL without tracking if not required in the field marked External URL.

Social Button Share Links
On all social media buttons please make sure to only use one word maximum for example, "Facebook". This ensures that the button looks correct across all devices and email clients.
Facebook Share:
Create the tracked link correctly according to the tracking guide.
utm_campaign = Choose the appropriate campaign e.g cageage
utm_source = facebook
utm_medium = shared
Once created, encode the tracked URL using the encoder tool https://meyerweb.com/eric/tools/dencoder/ - then add the encoded url to the external link field.
Select the orange pencil icon on the field titled "Encoded FB URL"
In the External field, carefully replace the existing link after "u=" NOT TO REMOVE the part "https://www.facebook.com/share.php?u="

When sharing an Engaging Networks page, Facebook generates messaging from the "Social Details/General Tab" of the page. The image is also pulled in from here. Please ensure this section of the page is populated correctly.
WhatsApp and X (formally Twitter):
Create the tracked link correctly according to the tracking guide.
utm_campaign = Choose the appropriate campaign e.g cageage
utm_source = twitter/whatsapp
utm_medium = shared
Take the tracked URLs and shorten them in Bitly: https://bitly.com/ or similar link shortening tool.
Then go to the encoder write out the message you want to share and add the bitly/short link to the end of your share copy.
e.g This brought a smile to my face! A really joyful video of farm animals having a life worth living #loveanimals https://bitly.com/yourlink
In the External field, carefully replace the existing link after "text=" NOT TO REMOVE the part "https://x.com/intent/post?text=" with your encoded message and link.

When sharing an Engaging Networks page, Twitter generates the image in the Twitter card from the "Social Details/General Tab" of the page. Please ensure this section of the page is populated correctly.
Email Share:
This one is a little different. It's in two parts with the subject line and body copy entered separately. Encode the subject line and body message separately and enter each into the appropriate fields in the content builder.
Create the tracked link to go in the body message correctly according to the tracking guide.
utm_campaign = Choose the appropriate campaign e.g cageage
utm_source = eafemail
utm_medium = shared
Take the tracked URL and shorten it in Bitly: https://bitly.com/ or similar link shortening tool.
The body message will display how it looks in the encoder editor. You can create paragraphs and line breaks before encoding the body message.
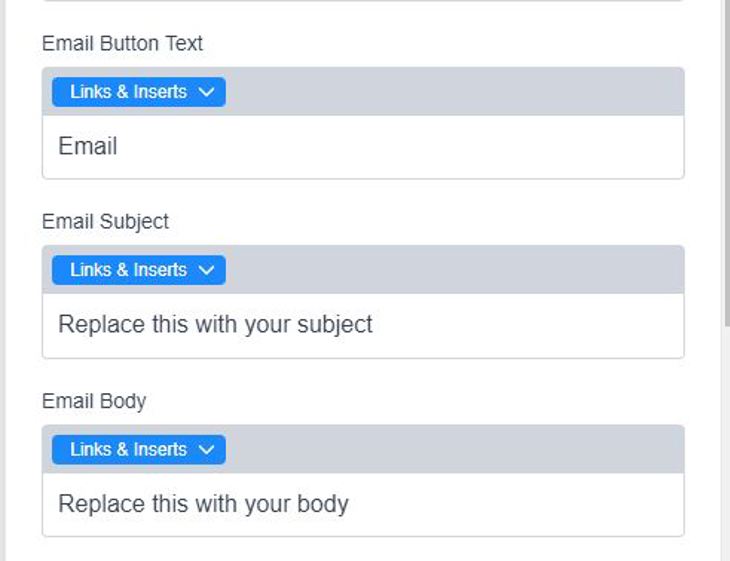
Telegram:
A telegram share link is made up of two parts, the share message text and the link.
Create the tracked link correctly according to the tracking guide.
utm_campaign = Choose the appropriate campaign e.g cageage
utm_source = telegram
utm_medium = shared
Take the tracked URL and shorten it in Bitly: https://bitly.com/ or similar link shortening tool. Paste the Bitly/short url into the encoder tool and encode it alone.
In the External field, carefully replace the existing link after "url=" NOT TO REMOVE the part "https://t.me/share/url?url=" when pasting in your encoded link.
Clear the Encoder tool, and write your message, then encode the message and copy.
In the external url field paste your encoded message after the text parameter "&text="

Click To Tweet Buttons
Use the X (formally Twitter) buttons for the Click To Tweet links. They may be on page 2 in the library blocks.
It's a similar process as for share buttons.
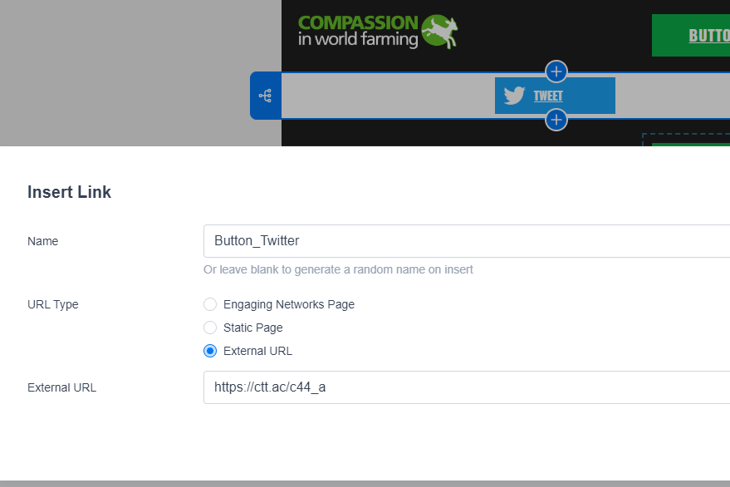
Method 1: encode your message and any links and past into the text field after "text=" (highlighted in yellow) while being careful not to remove the parts in brackets.

Method 2: if using a click to tweet link like this "https://ctt.ac/c44_a" simply remove ALL the pre-filled content and past the link in the field.
Sharing to Instagram is not possible, however, you can add post links behind buttons and create 'Follow Us' links that point to the account feed. This button has been provided as an option in the Share block at the request of some offices, although it is not technically a share button.
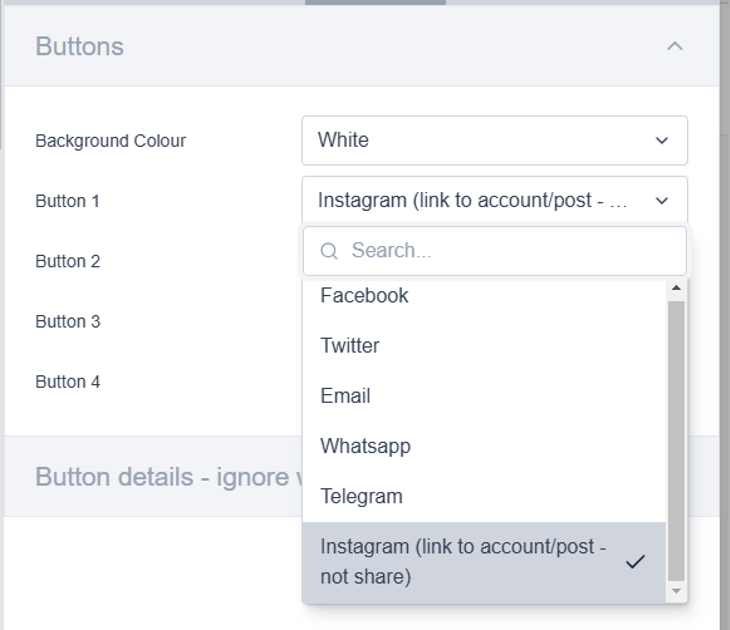
Insert links as external links. This is an external platform so no tracking is required to point to the account feed or direct to posts.
You can use this button to share to LinkedIn, or to simply send people to a page on LinkedIn.
Share link:
Create the tracked link correctly according to the tracking guide.
utm_campaign = Choose the appropriate campaign e.g cageage
utm_source = linkedin
utm_medium = shared
Take the tracked URL and optionally shorten it in Bitly: https://bitly.com/ or similar link shortening tool. Paste the URL or short url into the encoder tool and encode it.
In the External field, carefully replace the existing link after "shareUrl=" NOT TO REMOVE the part "https://www.linkedin.com/feed/?shareActive=true&shareUrl=" when pasting in your encoded link.

Simple link: If you just want to link to a page on LinkedIn, replace everything in the link field with your non-encoded URL.
X Card Troubleshooting
X Card Not Showing An Image
- If sharing an EN page make sure there is an image inserted in the social share section of the EN page at the correct size Min 600px wide and ratio of 1.91:1
- Use the Scrape function in the EN page Social Details Facebook Tab. Ensure it generates the message and image saved in the general tab
- Make sure the page being shared is in Live mode
- Share on Facebook - you can set the post to share privately so the public won't see it.
- Make sure that the message does not exceed the max character count of 280 including spaces.
Countdown Counter - Sendtric Timer
Add the Sentric Timer block to your email where you want it. Go to The Sentric Timer website to customise the timer using the colour hex numbers provided in the block and noted in this guide:
- Background Colour: White (255,255,255)
- Labels: Black (0,0,0)
- Digits: Green (11,171,71) - Orange (245,85,35) - Red (255,0,0)
Copy the highlighted part only of the code that is generated and paste that into the image url of the content block in the email.

Replace the placeholder url by highlighting the existing one in the text field and pasting over with the new one. Don't click on the image library icon.
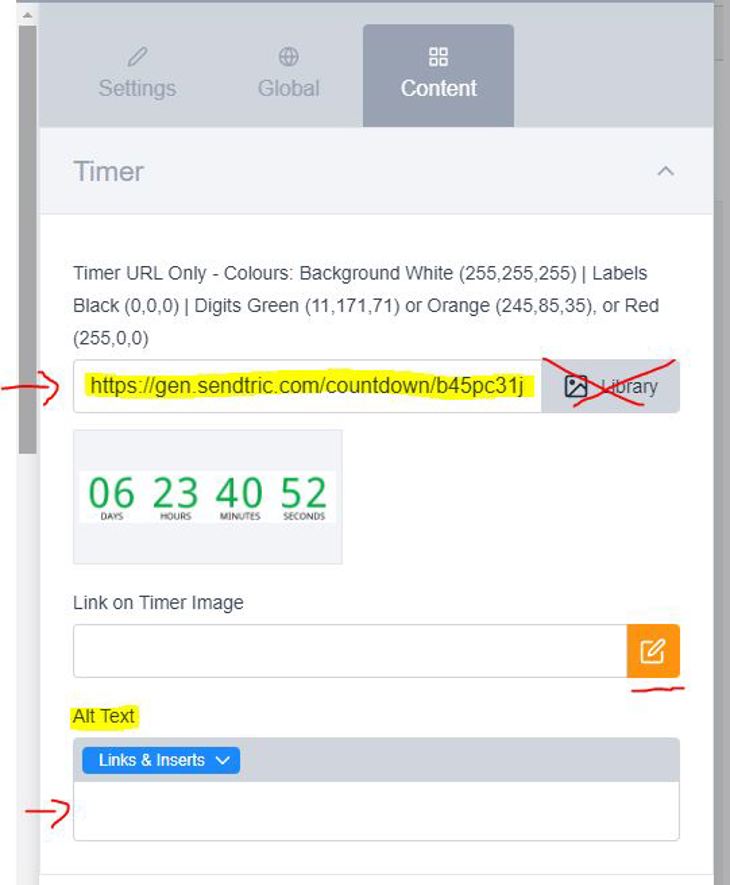
Add an optional link to the counter image using the usual yellow editor pencil icon for the link field and add alternative text description.
Important: please note that the counter has a limited number of views. There are 10,000 free views.
Adding Save The Date Links
To add in a Save The Date set of calendar links for an event email use the Save The Date content block provided in the library. Update the links using this free tool: https://www.labnol.org/calendar/
Set up a title, message, location (this can be a Facebook event page link), the date/time for the event and the timezone of the country the event is taking place in.
If using the all-day function you need to set it up for the following date. For an event on the 14th June set it to start and end on the 15th June.
Google and Yahoo Calendars
Use the Calendar Links options to select the calendar type.
Check each calendar link works and creates the event in each calendar type correctly by using the Preview Link button.
When happy copy the link from the Add To Calendar link field and update links for each of the calendar types: Google and Yahoo. Edit the url in the external link field for each link type replacing everything with the new link created in the tool.
Apple and Save The Date Button
Apple and Save The Date button should use the ics file option by clicking on the Download ICS button to download the ics file. Upload the ics file to Umbraco (Engaging Networks will not accept the file type) and update the Save The Date button and Apple links with the new ics url.
Reminder / Re-Send Emails
In order to avoid the requirement to rebuild an original email for a reminder or re-send, the black header will sit at the top of the page with the usual reminder content below and the forward titles underneath that. The original email content will follow from the Heading 1 title down.
To create a reminder or re-send an email simply duplicate the original sent email adding text components as required above the original content. There is a code block called "Reminder Header" in the Paragraph blocks that contains the horizontal line and forward titles ready for customisation.
Add a short reminder section of copy above the horizontal line. Update ALL links that point to engaging networks pages with new tracked links that contain the reminder email appeal code.
Duplicating the original email to create the re-send, will only work if duplicating within the same email type. For example single email to single email re-send or conditional to conditional re-send.
How to avoid having emails sent to SPAM folders
Here is a list of things that are considered flags for spam by email clients:
- Using 'Hot Words', capital letters and punctuation in subject lines especially exclamation marks
- Using 'Hot Words' in the body content
- Using a large number of links throughout an email
- An uneven ratio of text and images in the email
- Using 'Friend' as an alternative to addressing the subscribers name if we don't have their name (Spam Assassin doesn't like this)
- Images missing alt text
Avoiding doing the things listed above will help your emails stay out of SPAM boxes. While there are a number of factors as to why this can happen, and the list above is not an exhaustive list, nor is it a guarantee, but it should help.
Test your email and check your potential SPAM score in MailTester.
Using emoji's
A limited amount of emoji use in email subject lines and email content is fine. But don't overdo it. Please don't use emoji icons in place of bullet points. Use only the style list blocks provided.
If you are using emoji's be careful to use one from either of these two sites: Emojipedia and Email Emoji
While not guaranteed these two sites do seem to be fairly good at providing stable emoji icons.
Carefully test the email in various email clients and platforms. They can have a tendency to stretch and blow up, particularly Gmail desktop in Chrome browser.
Windows 7 machines and earlier versions will not show emojis, some emojis will be converted to Emoticons. Gmail will always show emojis regardless of the operating system.
Setting Up A Split Test Or Conditional Email
Split Test Email Campaign
To set up a split test, in the message tab after creating the first version of the email, select SPLIT TEST on the box for the core message under the heading "Build Your Message"
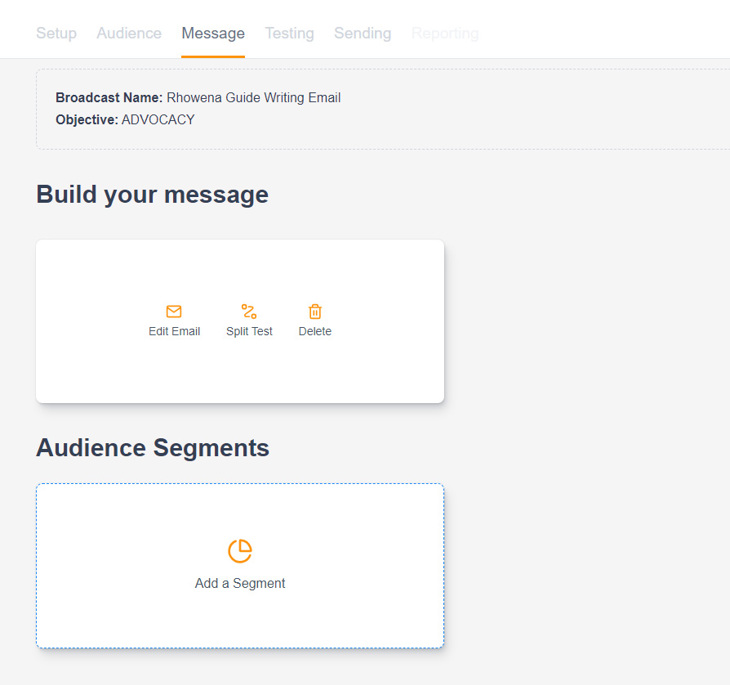
In the pop-up window select "ADD SPLIT" and then select either "CLONE FROM EXISTING" or "SELECT FROM TEMPLATE"
Create the alternative content the test is being done on. Save and close.
You will be brought back to the pop-up window where you can add more emails to the test or Select "DONE" when finished.
Click on the envelope icons to edit the content of either of these emails.
Conditional Emails and Dynamic Content
You can create different conditional or dynamic content within a single email campaign but you cannot use dynamic content when you have a split test. Instead, you must use the "AUDIENCE SEGMENTS"
You cannot have empty dynamic content for some audiences, each conditional content audience must have alternative content to view.
When there is no split test, to add dynamic content select the "SETTINGS" tab in the right-hand menu or click on the dynamic icon on the content frame.
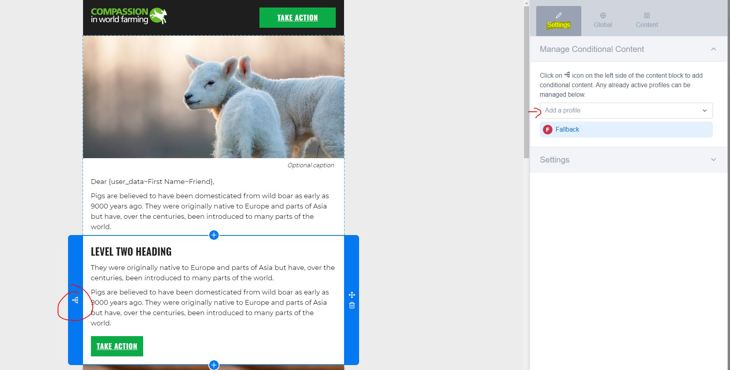
Select the audience profile you want for your dynamic content so they see Alternative content instead. You can do this to as many of the content blocks as you want. To remove it click on the X icon in the SETTINGS tab under Conditional Content.
Profiles are created in the DATA & REPORTS > PROFILES section of Engaging Networks. There is a separate guide on How To Create Profiles. Or contact the digital team for help and guidance.
Conditional Split Test Email Campaigns
You will always need to build your "Core" email first, this will be the email that goes to the fall-back section of your audience ie everyone else who doesn't fit any of the profiles assigned to the email variants.
Create the segments by clicking on "ADD A SEGMENT" under the "Audience Segments" heading in the message tab.
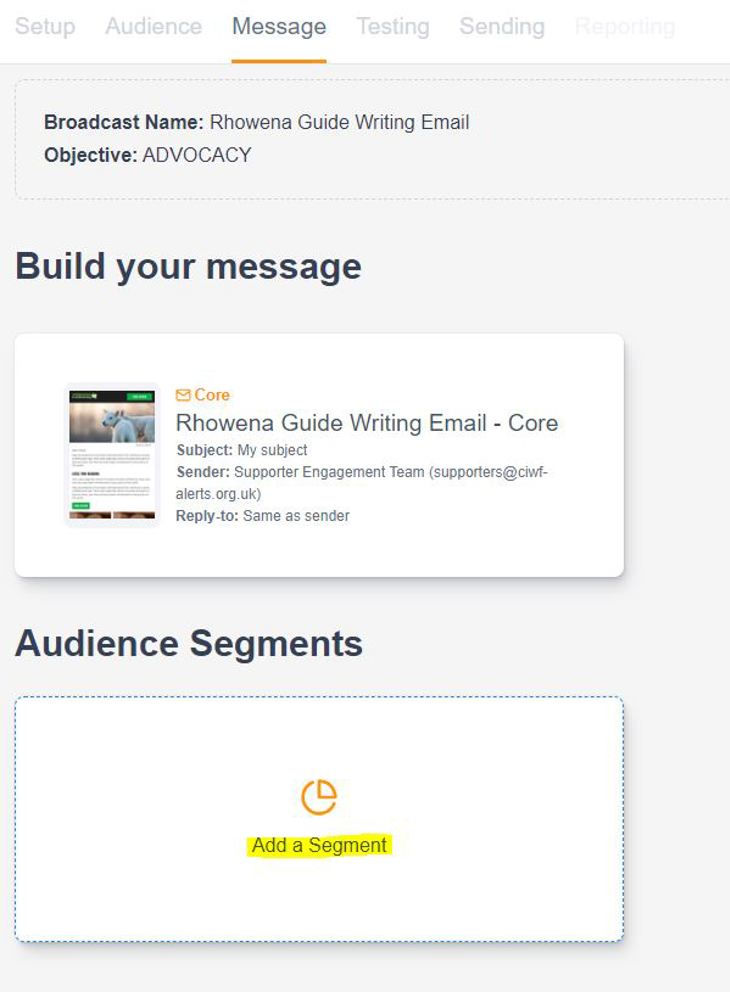
Carefully select the profile you want to apply to this email. Currently, this can not be corrected later if you choose the wrong one and you will need to re-build your email campaign over.
Select whether you want to create your email content from a template or by cloning and existing email.
Edit your email content. save and close. Add more segments as you need.
Apply any split testing you require to each of the email segments.
Order priority
When there are multiple segments, sometimes the order is important. Priority is left to right and the core email will always send last. An example of when the order is important is when you have people who could fit into two different profiles at the same time. Such as a segment with an Active Regular profile applied and a segment with Active Single applied. The fact the supporter is a regular donor is the priority, so even if they may have also given single gifts in the past we would want them to receive the Active Regular email content, so this email segment must come first.
Sending Email Tests
When your email content is ready, click the "CONTINUE TO TESTING" button on the lower left-hand side.
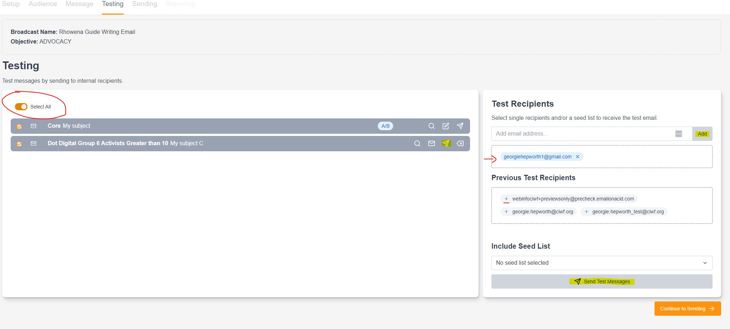
Toggle on the "SELECT ALL" option to receive a test of all the email in the campaign. Add contact email addresses to the Test Recipients field. Click on the grey "SEND TEST MESSAGES" button.
If you need to test just a single email you can select the "Sent Test" icon in the grey bar of the email you want to test. You can only add single address contacts to this option.
All emails built should be checked and tested by yourself and someone else in your team before sending to Digital team. You should check all links work and content displays properly.
Self Test Checklist
Use the quick checklist to confirm you have checked your email.
Duplicate the master tab in the sheet for your country office and name it the same as your email campaign name. Don't worry if the title gets truncated.
All emails should be tested by a member of the digital team when you have completed your own testing. Please allow three working days for testing to be completed. Raise a Sales Force case for the Digital Team and select the Email Testing option and fill in the fields.
When creating the case please include the following details:
- Subject line/s - this helps the email tester locate the email/s easily in their busy inboxes.
- Any testing such as segmentation or subject line testing.
- The number of emails to be tested and if there are any new or edited landing pages that also need to be tested.
- When the email is to be sent/scheduled for sending (Date Due).
- When you expect to have a test delivered – an estimate is fine (Asset delivery date).
- EN campaign name and location of the email in the EN account so that digital can easily locate the email for access to the build.
- Add a link or copy of your completed checklist confirming you have checked your email.
Selection Your Audience - Query Builder
When sending marketing emails your audience must be opted in to receive marketing communications from us. Almost always you will add your Opt-In profile to the blue "Build Your Universe" section of the query builder. Depending if you need to add additional filters and whether you want them to be AND conditions or OR conditions, will dictate whether the Opt In To GDPR question goes in the blue Build Your Universe section or the green Filter section.
Select the Question Tab and search for GDPR select the Opt-In to GDPR profile for your office. In the pop-up window make the selection option = y and untick match case.
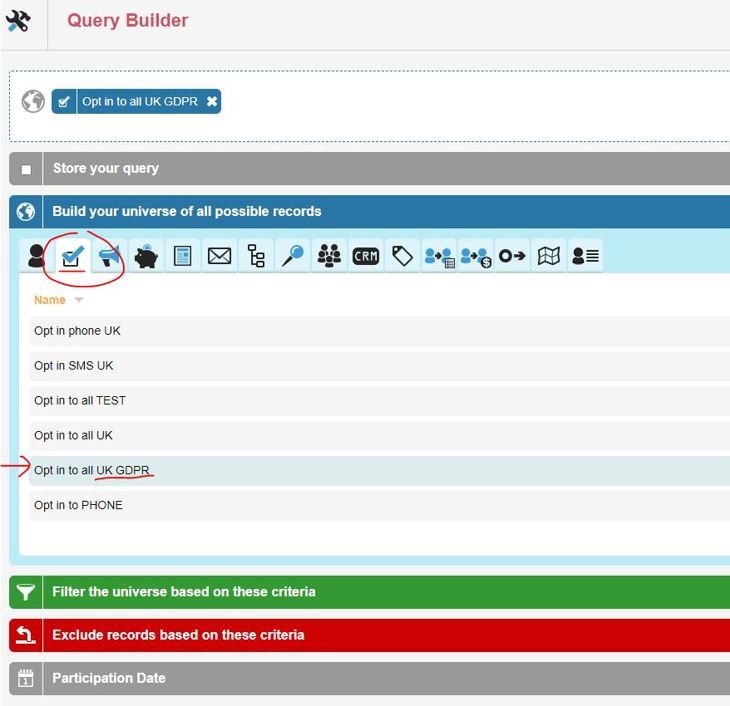
If you have multiple conditions in the "Build Your Universe" it creates an "OR" condition between them all.
The green Filter option can allow you to further define your overall target audience using various different criteria. If you add multiple conditions to the "Filter" section it will create an "AND" condition between them all.
The red "Exclusion" section allows you to exclude certain people from being sent any email in your email campaign. Always exclude Engagement Score 11 from your email broadcasts. This is an un-engaged segment of your database and they should be handled separately with a specialist program to re-engage them. If that fails they eventually are removed from the database.
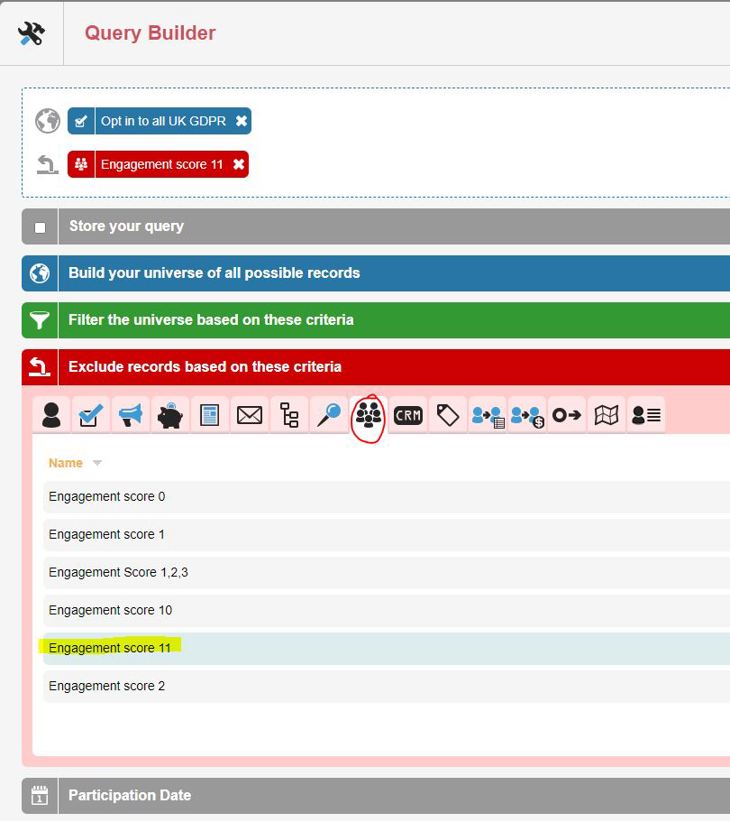
You can also add rules based on participation dates using the grey Participation Date section.
For more information about how the query builder works in general the Engaging Networks Support page has helpful information.
Sending The Email
There is not too much to this part of the process.
Split tests
You can select the proportion of the audience you want to send your split test to if you have a split test in your campaign.
Email Scheduling
Decide to send your campaign immediately or schedule it for a later date/time. Make sure you select the appropriate time zone.
When scheduling the message, you can also choose to use “Send Time Optimization”. This will attempt to send according to the “Send Date” and “Send Time” for the supporter’s timezone, based on collected data from when they interact with your pages.
This can also be uploaded via the Data & Reports > Import tool. You would need two columns at least in your CSV file – the email address of the supporter, and a column headed as “Send Offset” which can have values offset from GMT (+00:00) like
Emails need to be scheduled at least 24 hrs in advance of the send date/time for this to work effectively.
Supporters in Automation Workflows
There is an option that you may toggle on to " Include supporters on all Marketing Automation workflows" which allow supporters to receive the email being sent despite being in an automation journey. By default supporters in automation journeys do not receive any broadcast emails.
Seed List
Always select the "CIWF Seed List" from the seed list drop-down menu before sending the email.
Cancelling Scheduled Emails
If you have an email scheduled, you can re-schedule it, or cancel it directly from the broadcast list view:

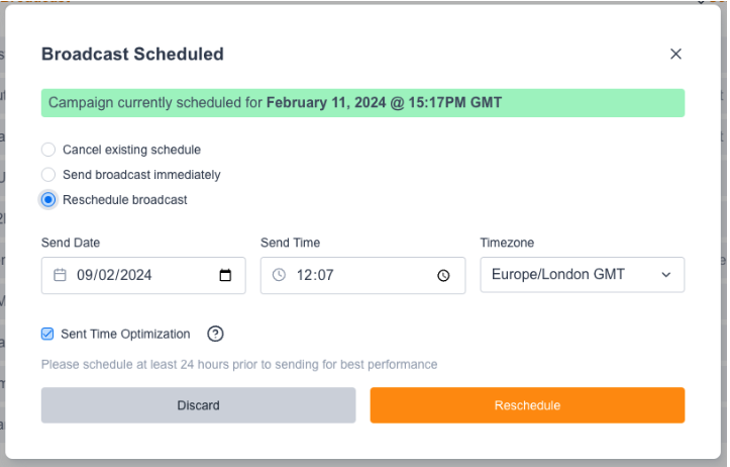
Alternatively, if you have an email scheduled, you can cancel it from the jobs monitor by clicking on the delete icon, a red X icon, under “Stop Job”. This will cancel your email job and allow you to return to the email campaign to make edits or reschedule.
NOTE: You can also cancel email jobs that are active but there will be a percentage of your list that still receives the email that is displayed as the “percentage complete”.
Direct Debit or Regular Gift Upgrade Emails
When sending out Direct Debit or other Regular Gift type upgrade ask emails that point to an upgrade form like this. If your market office doesn't have one and would like one made please request it through a Sales Force case for digital Team.
Make sure that Engaging Networks supporter details have been updated with their most recent gift status from Sales Force.
The fundraising team concerned should request the data from CRM team in good time ahead of the email send date and confirm that CRM team have updated supporter details in Engaging Networks before the emails go out.
The data is normally uploaded as close to the send data as possible for accuracy. The office should be aware not to use "empty field" for anything else in the time between the upload and email send.
These pages will have name, email, address fields in the form. They will also as a minimum have these fields named exactly like this in the back-end.
Direct debit current amount (current direct debit amount)
Direct debit frequency (frequency of their donation - always monthly)
Direct debit account no (Account number partly redacted, for UK this is account number, for FR, IT, UK this is IBAN)
Primary DD Reference (donation reference number)
Direct debit increase amount (depending on the choice of the market to be communicated to Mel/CRM, this value will either be the value tha that the donation should increase to or increase by)
Direct debit fiscal code (Italy only)
The values in bold above are the values that you can use from the "Insert Supporter Data" customisation option if you want to display this in your email content.
There is an additional field you can customise to your broadcast email only. It needs to be requested with the digital team if you wish to use it.
Direct debit new suggested total. This field cannot calculate or adapt to the amount the supporter finally decides to upgrade by so cannot be used in the form or the thank you autoresponder emails.
